TOP 5 TIPS FOR PREPARING INTERNAL TALENT

Whether you’re shooting a CEO update for internal communications or a corporate culture video for social, chances are you’ll need to leverage your fellow team members as on-screen talent. While some of your coworkers will welcome this opportunity to shine on camera, others may shudder at the thought of being in front of those big studio lights. In these scenarios, it’s more important than ever that you have a strategy in place to ensure your talent feels comfortable on set.

Here are my top five tips on what to do before and during a shoot to help your team members deliver their best possible performance:

1. SHARE THE SCRIPT BEFOREHAND

The actual shoot should never be the first time your on-screen talent sees the script. Make sure they get their eyes on it at least a few days in advance so that they can familiarize themselves with the content and get comfortable with what they’re saying. And consider organizing a table read with everyone involved in the shoot. This can be particularly beneficial for videos that involve ensemble casts or first-time actors.

2. PREPARE A VISUAL PACKAGE TO HELP SET THE SCENE

Whenever possible, create the world in which the person is going to be acting in first. For instance, if an individual’s speaking role lives within a larger b-roll or graphics package, produce that shell before you shoot in the studio. By sharing those assets with your team member, you can provide them with more clarity on the overall style of the video and how they should behave on screen.

This step is particularly important in projects where the actor needs to take on a unique persona to hit the desired tone. For instance, in our recent internal sales spiff video, we were going for an old game show vibe—and we shared our graphics package with our talent ahead of time so he had all the inspiration he needed to play host for the day.

3. START THE SHOOT WITH A PRACTICE RUN

During the first 10 minutes or so, take the time to go through the script together. Ask the talent to read through their lines, and offer to adjust any words or phrases that just don’t feel right to them. It’s important for the speakers to appear natural, so make any necessary tweaks to avoid the “I would never say it that way” scenario. Doing this at the onset empowers you to adjust the teleprompter accordingly, making your talent feel even more comfortable when it comes time to get in front of the camera.

4. ENCOURAGE YOUR TALENT TO KEEP GOING

Of course, it’s only natural to want to stop and start over when you trip on a word or forget an important part of the line. But in reality, getting stuck on one particular sentence will only make the individual feel frustrated and decrease their overall confidence on camera. Coach your team member to ignore the mistake and keep going. And let them know that you’ll keep track of which parts you’ll need to go back to later. Just be sure to give them a nod of assurance that they’re doing great so far.

5. RUN THROUGH THE SCRIPT MULTIPLE TIMES

Experience level comes into play here, but many of your internal video stars will become increasingly comfortable with each run through—which will in turn lead to a better overall performance. By letting them know that the plan is to compile the best takes from each run through, you can assure them that they don’t have to do a perfect read every time. And if you find that they really hit their stride in the latter half of the last read through, be sure to do the whole thing one more time so that their tone is consistent throughout.

That being said, if you sense that someone is becoming increasingly stressed or frustrated with each take, don’t be afraid to stop for a bit to let them regain their composure.

In these scenarios, reiterate that your team member has worked really hard so far and they deserve a quick break. And, if applicable, consider having them watch one of your more experienced team members run through their section of the script to pick up some tips and tricks.

THE GOLDEN RULES OF COACHING TALENT

As a general best practice, be sure to focus on the end result when you’re on set. By coaching your talent through the lens of “this is what this video needs to be to hit X goal,” you can encourage alignment and offer a gentle reminder that any feedback you provide isn’t personal.

And be sure to take the pressure off of them whenever possible. For instance, let’s say you’ve ran through a certain section a few times and it still isn’t just right, but the talent feels comfortable with their performance. Consider blaming an outside factor—like a distracting sound or an equipment snafu—for wanting to do just one more take.

Overall, it’s important to remember that your internal talent will have varying degrees of experience and comfort on camera. When producing videos with your team members, be sure to assess every situation to determine what tools and coaching each individual needs to produce the best possible performance.

About the chat function during live broadcasts (Part 1)

If you would like to implement a chat function, Brightcove recommends using (in conjunction with) the product “Chatroll” from Chatroll, a company based in Toronto, Canada. In this article, we will explain how to implement a chat function when live streaming using Chatroll.

GET MORE BANG FOR YOUR BUCK: TURN YOUR ASSETS INTO VIDEOS

We get it: Each piece of marketing content you create takes valuable time, effort, and money to get it just right. So, whenever possible, you should focus on repurposing this content to build larger campaigns—instead of creating “one-off” assets. Here are some tips and tricks on how to get the most out of your marketing materials by repurposing your content into captivating videos, engaging graphics, and more.

BREATHE NEW LIFE INTO WHITE PAPERS AND BLOGS

These two content types can often inform each other—as you can easily create white papers out of blogs posts and vice versa. If, for example, you have a series of blog posts around video marketing, you can incorporate them into a larger asset. Just be sure to tie these different pieces together in a cohesive way, and provide additional value through inserting new content. This may include survey data, relevant customer stories, worksheets, or checklists. Similarly, if you’ve created an informative, long-form white paper, consider how you can pull out valuable nuggets and build upon them to create standalone blog posts that can increase your reach via social and other channels.

Ready to take this content to the next level? Consider how you can turn your written assets into videos. Take the following steps:

  • Dive into your analytics to see which blog posts are performing best—and which gated assets are driving the most leads.

  • Refer to the results to create a list of video projects you’d like to launch, and prioritize them based on your company’s current goals and objectives.

  • Determine which video format would work best for each initiative (i.e., interviews, talking-head videos, or graphic videos).

Once you’ve taken the steps above, you’ll be ready to kick off each project, which will involve choosing talent, writing scripts, and aligning on a production schedule. Overall, transforming your written content into videos will empower you to reach (and engage) new audiences—and boost your ROI.

GET THE MOST OUT OF YOUR INDUSTRY RESEARCH

Have you recently conducted industry research? These stats and insights can drive a variety of different assets, including:

Data reports. Dive into the full survey results and what they mean for the industry by calling out key themes. You get bonus points if you can create these reports on quarterly or annual basis—as doing so helps to establish your brand as a thought leader.

Infographics. Choose one of the overarching stories found in your results and tell that narrative through highlighting a few key data points with engaging graphics.

White papers. If the data corresponds with topics you will be discussing in one of your upcoming long-form assets, incorporate charts and graphics with corresponding stats that further your thought leadership.

If you really want to take this content to the next level, turn your valuable data into engaging video assets. Doing so will maximize your exposure and boost your ROI. Consider creating:

  • Longer videos that give an overview of the results as a whole

  • Shorter clips that highlight a particularly important theme or trend (and can be shared on social!)

  • Graphic videos that present statistics in a visually engaging way

TURN YOUR VIDEOS INTO MORE VIDEOS

When you kick off a new video project, be sure to think about the big picture. Instead of just planning for the one asset, consider how you can leverage the footage you shoot or graphics you create in other materials down the line. Here are a few examples to inspire you:

  • Live streams. Will you be live streaming interviews at an upcoming industry conference? Consider which footage could be leveraged to create video on demand (VOD) assets and plan out your questions accordingly.

  • Event footage. Shooting some b-roll of your annual company event? Be sure to collect some footage that isn’t too timely or specific to this year’s theme. That way, you can incorporate some shots into your promo materials for next year’s event.

  • Promo videos. Creating a video to announce your latest e-book, white paper, or larger campaign? Cut a series of shorter clips that you can incorporate into your social calendar over the coming weeks.

Whether you’re writing a new e-book or launching a new data report, there’s no question that creating compelling, engaging content takes time, effort, and expertise. Don’t waste your valuable assets by creating one-off pieces of collateral. Incorporate video into everything you do to maximize your ROI, boost your exposure, and take your marketing campaigns to the next level.

OUR START-TO-FINISH GUIDE TO VIDEO INTERVIEWS

Have you ever finished an interview, only to wonder if you even got the soundbite you really needed? It turns out, there’s a pretty fool-proof way to avoid this situation, and it doesn’t involve rolling up to your interview set and crossing your fingers that the subject says exactly what you need them to say.

Here’s our step-by-step process for ensuring that you walk out of your next interview with soundbite gold.

VIDEO INTERVIEW TIPS FROM START TO FINISH

1. CREATE A STORY OUTLINE

The first step is understanding the type of story that your interview will be part of. Every story has its own narrative and sequence of events. But generally speaking, you have an overall structure that fits into a story archetype. For example, in customer storytelling, the story is often about your customer overcoming challenges with your product or brand as a partner—so you want to explain the challenges and the steps your customer took to overcome them. To make it compelling, you’re looking for conflict: what were the roadblocks in the beginning? What issues came up throughout? That’s where you get to talk about how your brand is a true strategic partner to its customers.

When your structure is in place, you research every aspect of your story to add depth. Just like a job interview, you absolutely don’t want to show up unprepared—you should already have an idea of what the answers might be, be familiar with any technical concepts, and know the story backwards and forwards so you know how to communicate with your subjects and ask the right follow-up questions. Your subject will open up a lot more if they recognize that you know what you’re talking about.

2. CONDUCT PRE-INTERVIEWS

The story you mapped out in step one likely has a few characters. You next have to figure out who those characters are, and who lived through each part of the story. Think of this step as casting your video. When you have a list in mind, you want to talk to those people over the phone or video chat. This is a pre-interview—think of it as an audition and a fact-finding mission rolled into one.

You’ll find out who speaks clearly and who gives one-word answers, learn background details on your story, discover areas where you need to do more research before actual interviews begin, and build rapport with your subjects. Gauge what is going to get them to talk: are they touchy-feely and want to approach things from emotions? Are they tech-focused and want to approach things from the implementation or technical side?

3. CREATE A LIST OF QUESTIONS 

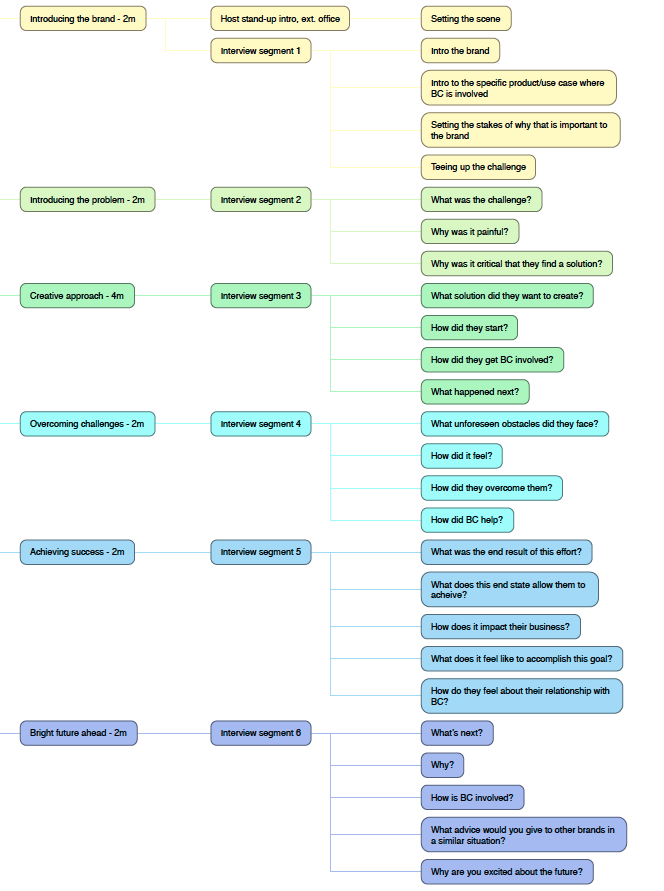
Now that you’ve done all the necessary research and filled out your story outline with details from your pre-interviews, you use that outline to create your interview questions. With each milestone in your story, you should know who you’ll be talking to and what you need them to describe. Here’s an example of how I map questions to my story outline using a tool called iThoughts:

The list of questions doesn’t have to be super prescriptive, and you may not stick to it 100 percent. But it should give you an idea of the must-have information that you’ll need.

4. CONDUCT YOUR INTERVIEW

Alright, it’s time for your interview—take a deep breath. You’ll want to be relaxed so that your subject feels at ease. When they arrive, engage them in small talk and be friendly—if you cut straight to business, they may feel rushed and get defensive. Because they’ll be on camera, it’s important that they feel comfortable.

When they get on set, help them get situated, then take your place. Explain what they should expect during the interview, tell them where to look (at you? At the camera?), and remind them it’s okay to restate an answer or ask for clarification. Ask them a couple easy questions, like what they ate for breakfast. This not only helps them get settled, it also gives your crew time to test audio and set focus.

When you’re ready to get started, keep the tone conversational and give your subject plenty of room to answer. If you take nothing else away from this post, make this your golden rule: wait a few seconds after your subject finishes speaking before you respond. It may feel awkward, but it’s essential—it ensures that you don’t interrupt or speak over them, making the audio unusable, and it also gives them room to add more information. That’s often where I’ve gotten some of the most compelling stories. If you feel tempted to acknowledge or interact while your subject is speaking, stick to silent cues like nodding and smiling.

If you’re not getting an answer that you need, feel free to move on and circle back to it later (just make a note so you don’t forget). Rephrase questions, or fall back on open-ended follow-ups like “Why?” or “How did that make you feel?”

I like to close interviews with forward-looking questions like “What are you excited to do next?” That puts people in a good frame of mind, even if it’s not useful to your final product. You want your subject to leave the interview feeling happy with the result.

5. SEND A THANK-YOU EMAIL

Follow up in a timely manner. Thank your subject for their time and resources, and reinforce the key details they’ll want to know. This can include the next steps in your production process, how the footage will be used, and the agreed-upon approval process.

Follow these steps and you’ll become your company’s go-to interviewer—not to mention your editor’s hero when it comes time to pull soundbites.

Want more tips on video strategy? Check out our round-up of video resources.

REVISED MRC VIEWABILITY GUIDELINES: EVERYTHING YOU NEED TO KNOW

Walking the tightrope of maintaining high viewability while trying to maximize the number of ad impressions is not a new process to the majority of publishers working with video advertising. However, that tightrope just got a bit trickier to navigate—the Media Ratings Council (MRC) has recently released their updated guidelines on what they consider to be a “viewable ad impression.”

The previous definition of “viewable” was that 50% of the ad needed to be in view for at least 2 seconds. Under the new guidelines, for “combined and deduplicated cross-media video measurement,” the ad has to be 100% in view for 2 seconds or more. The other large change is that this requirement will also be used for Over the Air Programming (OTA), Over the Top Programming (OTT), and connected TV (CTV) platforms in addition to just desktop and mobile. In this blog post, I will outline the potential impact this definition may have, as well as offer some suggestions to ensure you can meet (and exceed) this new challenge.

WHY IS THE NEW DEFINITION NEEDED?

It’s important to understand that while this change may seem somewhat unfriendly to publishers, it will also be positively received by brands and advertisers. There is no doubt that tracking viewability on  ad impressions is one of the most effective ways a brand can verify that its message is reaching human eyeballs and also weed out potential cases of fraud, which is still prevalent in digital advertising. To combat this, agencies that represent many of the largest brands target their ad spend on impressions that are verified to be viewable.

In addition, many of the largest ad agencies have already moved beyond the MRC’s previous definition and are using their own criteria for viewability. For example, GroupM’s standard for “viewable” ads has been stricter than the MRC definition since 2014, requiring 100% of the pixels to be in view. This allows agencies like GroupM to provide its customers with additional assurance that their ad dollars are not  spent on fraudulent or underperforming impressions. As such, the buy side will see the MRC’s revised definition as playing “catch up” to expectations that have already shifted.

EFFECT ON PUBLISHERS

Publishers may not see this new definition as favorably as agencies. Much of the struggle comes from the methods by which viewability is currently measured: VPAID that executes JavaScript. This method is prone to causing errors on mobile platforms and does not function in an OTT or in-app environment. Furthermore, VPAID is not supported by Server Side Ad Insertion (SSAI), completely nullifying viewability measurement applications of that ad format. All of this means that the traditional method by which viewability has been measured works only on desktop and mobile web, and is not completely reliable. Publishers have been forced to look to direct deals or private marketplaces to fill their OTT inventory while struggling with troublesome VPAID scripts on desktop and mobile.

Of course, VPAID is not the only viewability challenge. Examples can include an interstitial banner ad that blocks a video from sight, a website prompt that takes precedence over the content, errors with autoplay, or poor player implementation, among many others. Viewability has a clear impact on a publisher’s fill rate and CPM so a stricter criteria combined with hiccups in measurement can negatively affect the bottom line.

BEST PRACTICES

Publishers need to be careful and constantly check their online properties for elements that may cause their viewability to drop, such as the aforementioned interstitials or pop-ups. However, they can also use Brightcove player implementations to improve viewability.

The first option is to use a player that automatically resumes and pauses when the user scrolls in and out of view. This prevents it from continuously playing in the background while no one is looking, which can have a detrimental effect on viewability. Here’s a code example for this type of player. A second option to guarantee a high viewability player is to use a “floating” player, otherwise known as a “picture in picture” plugin. You can find a sample here. The plugin makes the player hover on the bottom right corner of the display area when a user scrolls past it, ensuring it is always in view. Do note, however, that this may be a more controversial method among the end users as it is often considered intrusive or annoying. Despite that, many publishers find the floating player to be extremely valuable.

Beyond player and website implementation, there are several emerging technologies that can make reaching the new viewability standards easy. VPAID, and the issues it presents, should eventually make way for the Open Measurement Software Development Kit (OM SDK) and VAST 4.2. In tandem, these technologies should alleviate many of the current challenges in the ecosystem, including the difficulty of measuring in-app and OTT ad impressions and the fragmentation of measurement methodologies. In addition, the emerging Automated Content Recognition (ACR) technology is able to read pixels on a smart internet-connected device (such as Roku or Apple TV) as it delivers video content to a TV consumer. This allows for insight into real-time data previously inaccessible on traditional TV platforms and bridges the gap with digital video technologies. The challenges ahead for all of these technologies will be in getting wide adoption as well as gathering end user consent and “opt-ins” in order to adhere to regulations such as GDPR and CCPR.

The new MRC guidelines may add some challenges to publishers in the short term, but the impact may be quite minimal due to the extent to which the ad industry already emphasizes viewable impressions. There are steps the sell side can take to ensure better performance, whether by optimizing their properties or using one of the suggested plugins for the Brightcove player. Finally, the future looks bright as new verification solutions become commonplace in the market, helping to bridge the divide between digital ads and the traditional TV space—while also helping brands make more informed buying decisions.