BRIGHTCOVE VIDEO PLAYER: ADVANCED PLUGINS

If you’ve been a Video.js user for a while, you’re likely familiar with the concept of plugins: functions that become methods of any player you create. If you’re not familiar with Video.js plugins, we have a comprehensive plugins guide available.

These plugins—which we’ll call basic plugins—are lightweight and offer complete control of the player. That’s really useful and it isn’t changing.

But what if you want a richer set of features? Or more guidance on how to structure your plugin? Or more tools out of the box that help manage complex plugin-rich players?

Well, until Video.js 6.0, you had to figure things out on your own.

Introducing Advanced Plugins

One of Video.js’ strengths is its rich ecosystem of plugins. So in the last few months, we wanted to focus our efforts on improving the plugin author experience.

While projects like the plugin generator make becoming a plugin author easier than ever, the Video.js team thought it was important to provide a foundational API and set of conventions on which the future of Video.js plugins could be built.

Our solution is advanced plugins.

Advanced Plugins are Component-Like

One of the design goals for advanced plugins was to provide an API that was reminiscent of the existing components system. We achieved this in a number of ways.

At the lowest level, this included a name change for the plugin registration function from videojs.plugin to videojs.registerPlugin (taking a naming cue from videojs.registerComponent and videojs.registerTech).

Beyond a simple registration method name change, advanced plugins are class-based. A trivial example of an advanced plugin might look something like this:

var Plugin = videojs.getPlugin('plugin');

var HelloWorld = videojs.extend(Plugin, {
  constructor(player) {
    Plugin.call(this, player);
    this.player.addClass('hello-world');
  }
});

videojs.registerPlugin('helloWorld', HelloWorld);


If you’re using an ES6 transpiler, you can use ES6 classes in a similar fashion.

This plugin can be initialized in the same way as a basic plugin—via a player method whose name matches the registered name of the plugin.

In the case of advanced plugins, this method is a factory function, which instantiates the plugin class and returns an instance.

It’s useful to know that the player method that is created will always be a function. If a player already has an instance of an advanced plugin, its associated method will simply return the pre-existing instance rather than re-initialize it:

var player = videojs('my-player');
var instance = player.helloWorld();

// Logs: 'true'
videojs.log(instance === player.helloWorld());


The helloWorld method will return this plugin object until it is disposed – after which it will create a new plugin instance again.

Events

Similar to components, advanced plugins can listen to and trigger events via the ononeoff, and trigger methods.

This provides a loosely coupled communication channel for plugins and other objects (components, players, etc) to manage their own state and respond to changes in the state of one another.

Additional Event Data

The Video.js event system allows additional data to be passed to listeners as a second argument when triggering events (the first argument is the event object itself).

Plugin events pass a consistent set of properties in this object (including any custom properties passed to trigger):

  • instance: The plugin instance, which triggered the event.
  • name: The name of the plugin as a string (e.g. 'helloWorld').
  • plugin: The plugin class/constructor function (e.g. HelloWorld).

For example, a listener for an event on a plugin can expect something like this:

var player = videojs('my-player');
var instance = player.helloWorld();

instance.on('some-custom-event', function(e, data) {
  videojs.log(data.instance === instance); // true
  videojs.log(data.name === 'helloWorld'); // true
  videojs.log(data.plugin === videojs.getPlugin('helloWorld')); // true
  videojs.log(data.foo); // "bar"
});

instance.trigger('some-custom-event', {foo: 'bar'});


Lifecycle

Another similarity between plugins and components is the concept of a lifecycle – more specifically, setup and teardown processes.

We get the setup feature as a side effect of normal object creation in JavaScript, but we are left to our own devices when it comes to object destruction and ensuring that references between objects are cleaned up to avoid leaking memory.

Video.js components have long had a dispose method and event that deal with removing a component from the DOM and memory. Advanced plugins have the same feature:

var player = videojs('my-player');

var firstInstance = player.helloWorld();

// Logs: 'true'
videojs.log(firstInstance === player.helloWorld());

firstInstance.on('dispose', function() {
  videojs.log('disposing a helloWorld instance');
});

// Logs: 'disposing a helloWorld instance'
firstInstance.dispose();

var secondInstance = player.helloWorld(); 

// Logs: 'false'
videojs.log(firstInstance === secondInstance);


The pluginsetup Event

Plugins do have one lifecycle feature that components do not: the pluginsetup event.

This event is triggered on a player when a plugin is initialized on it:

var player = videojs('my-player');

player.on('pluginsetup', function(e, hash) {
  if (hash.name === 'helloWorld') {
    videojs.log('A helloWorld instance was created!');
  }
});

// Logs: 'A helloWorld instance was created!'
player.helloWorld();


React-inspired Statefulness

One of the exciting additions in Video.js for both advanced plugins and components is React-inspired statefulness. Essentially, this means that all plugin objects and component objects have a state property, which is a plain object that can be used to store variable state for that object. Then, there is a setState method that updates this object and triggers a statechanged event.

This system allows plugins and components to use their evented nature to communicate in-memory state changes through a consistent API:

// A static property of the constructor can be used to pre-populate state 
// for all instances.
HelloWorld.defaultState = {color: 'red'};

var player = videojs('my-player');
var instance = player.helloWorld();

instance.on('statechanged', function(e) {
  var color = e.changes.color;

  if (color) {
    videojs.log('The helloWorld color changed from "' + color.from + '" to "' + color.from + '"!');
  }
});

// Logs: 'The helloWorld color changed from "red" to "blue"!'
instance.setState({color: 'blue'});


Player Plugin Awareness

Finally, we couldn’t add new plugin infrastructure without working on one of the more pernicious problems of managing complex combinations of plugins: the player can’t report which plugins it has initialized – or not. To this end, the player has two new methods: hasPlugin and usingPlugin. These methods work for both types of plugins.

The hasPlugin Method

This method reports whether a plugin matching a given name is available on the player:

var player = videojs('my-player');

// Logs: 'true'
videojs.log(player.hasPlugin('helloWorld'));

// Logs: 'false'
videojs.log(player.hasPlugin('fooBar'));


This method ignores whether or not the plugin has been initialized and merely reports whether or not it has been registered.

The usingPlugin Method

This method reports not only whether a plugin is available on a player, but whether it is currently active on the player:

var player = videojs('my-player');

// Logs: 'false'
videojs.log(player.usingPlugin('helloWorld'));

player.helloWorld();

// Logs: 'true'
videojs.log(player.usingPlugin('helloWorld'));


One caveat to note: While this works for both types of plugins, only advanced plugins can change this value more than once. A basic plugin has no built-in lifecycle or events, so it’s not possible to determine whether one has been “disposed.”

Go Forth and Code

We hope these additions and improvements to the plugin architecture will make writing Video.js plugins more pleasurable and remove some of the low-level legwork involved in ensuring plugins aren’t creating memory leaks and other problems.

The design of advanced plugins is such that we can add features as 6.0 matures and we get more community feedback. As always, we strongly encourage our users to give back to the Video.js project in whatever way they can.

This was originally posted on the Video.js blog.

BRIGHTCOVE VIDEO PLAYER: MIDDLEWARE

Middleware is one of the cool new features that is coming to Video.js in version 6.0.

With middleware, you are now able to interact with and change how the player and the tech talk to each other. The tech is Video.js’s abstraction from the player, separating the player API from the playback technology. With techs, we can plug things like a Flash fallback or a Youtube embed into Video.js without changing the external API or the look-and-feel of the player.

Video.js middleware are like Express middleware but routes are based on video MIME types.

A lot of Video.js users may be familiar with middleware from projects like Express. Video.js middleware isn’t that different from those. In both cases you register your middleware against a particular route to call down the chain when the route is triggered. In Express, routes are based on the url paths. In Video.js, these routes are based on the video MIME type. And, like Express, there are “star” (*) middleware that match all routes.

There are two important pieces to be aware of with middleware:

  • Dynamic source handling
  • Intercepting the player and tech interactions

A Video Catalog

With the dynamic source handling, you could load video with a custom type and source and resolve it asynchronously. A good example for this is a video catalog system. The page can be rendered with a specific catalog ID and a special MIME type, like so:

<video controls class="video-js">
  <source src="123" type="video/my-catalog">
</video>

Then, you could register a middleware for that route — the type video/my-catalog.

// middleware methods get the player instance as an argument
videojs.use('video/my-catalog', function(player) {

  // middleware are expected to return an object with the methods on it.
  // It can be a plain object or an instance of something.
  return {

    // setSource allows you to tell Video.js whether you're going to be handling the source or not
    setSource(srcObj, next) {
      const id = srcObj.src;

      videojs.xhr({
        uri: '/getVideo?id=' + id
      }, function(err, res, body) {

        // pass null as the first argument to say everything is going fine and we can handle it.
        next(null, {
          src: body.sourceUrl,
          type: body.sourceType
        })
      });
    }
  };
});

Then, when Video.js initializes, it’ll go through and call the middleware that are set for video/my-catalog.

Server-Side Ad Insertion

Server Side Ad Insertion (SSAI) is a great fit for middleware. It showcases the ability to intercept the play and tech interactions. For example, you have a 30 seconds ad followed by a five minute video in your HLS manifest. You want the timeline to display the ad time and the content time appropriate when each is playing. Right now, the duration displayed will be the combined duration of five minutes and 30 seconds (5:30). The solution is to add a middleware that knows when the ad is being played and tells the player that the duration is 30 seconds and when the content is playing that the duration is five minutes.

// register a star-middleware because HLS has two mimetypes
videojs.use('*', function(player) {
  return {
    setSource(srcObj, next) {
      const type = srcObj.type;

      if (type !== 'application/x-mpegurl' && type !== 'application/vnd.apple.mpegurl') {

        // call next with an error to signal you cannot handle the source
        next(new Error('Source is not an HLS source'));
      } else {

        // in here we know we're playing back an HLS source.
        // We don't want to do anything special for it, so, pass along the source along with a null.
        next(null, srcObj);
      }
    },

    // this method gets called on the tech and then up the middleware chain providing the values as you go along
    duration(durationFromTech) {
      if (areWeCurrentlyPlayingAnAd(durationFromTech)) {
        // since we're now in an ad, return the ad duration
        // in a real example you'd calculate this based on your playlist
        // rather than hardcode a value in here
        return 30;
      } else {
        // we're playing back content, so, return that duration
        return 5 * 60;
      }
    }
  }
});

Playbackrate Adjustment – A Case Study

A simple but interesting middleware to look at is the playbackrate-adjuster. This middleware will change the times of the controls depending on the current rate. For example, if you’re playing back a 20 minute video and change the rate to 2x, the controls will adjust to display 10 minutes. Let’s take a look at the code.

videojs.use('*', function(player) {
  /* ... */

  return {
    setSource(srcObj, next) {
      next(null, srcObj);
    },

    duration(dur) {
      return dur / player.playbackRate();
    },

    /* ... */
  };
});

So, here, we attach a star-middleware because we want to have it applied to any video, regardless of the MIME type. In setSource, we also call next directly with null and the srcObj because we want to use this middleware with any and all sources. We also set up our duration method to take in the duration from the previous middleware and divide it by the playback rate we get from the player.

If you look at the code you can see some other methods next to duration. They’re there to make sure other methods that rely on timing get updated. The two methods to notice are currentTime and setCurrentTimecurrentTime gets called when we want to know what the current time is. setCurrentTime is called when we’re seeking. Because the user is seeking in the shifted time, we want to apply our change operation in reverse. Instead of dividing it, we want to multiply it.

    currentTime(ct) {
      return ct / player.playbackRate();
    },

    setCurrentTime(ct) {
      return ct * player.playbackRate();
    },

If you were to apply what we’ve done so far, you’ll notice that the nothing changes, the control bar is still showing a duration of 20 minutes. This is because as far as Video.js knows, nothing has changed. So, we need to tell Video.js that the duration has changed. We can do that by storing the tech that Video.js gives us after source selection is complete.

videojs.use('*', function(player) {
  let tech;

  return {
    setTech(newTech) {
      tech = newTech;
    }

    /* ... */
  };
});

And then, when the ratechange event triggers, we tell Video.js that the duration has changed and Video.js will update the controls accordingly:

videojs.use('*', function(player) {
  let tech;

  player.on('ratechange', function() {
    tech.trigger('durationchange');
    tech.trigger('timeupdate');
  });

  return {
   /* ... */
  }
});

See a live example, and the complete code.

This was originally posted on the Video.js blog.

HOW TO ADD INTERACTIVITY TO BUSINESS VIDEO

A common fear of marketers? That our message isn’t resonating with our audience. In fact, when a viewer watches 60% of our video we consider this a victory. So, how do we double down on engagement? One word: Interactivity.

Adding interactivity to your videos keeps attention on your content and empowers the viewer to act at any point and fully engage them. Not only that, with interactivity you are able to lead your viewers towards a specific call-to-action, such as downloading content or signing up to learn more about a specific product.

The data around interactivity is compelling:

  • 66% of marketers who use interactive video claim its biggest benefit is higher engagement
  • 44% of marketers who use interactive video claim its biggest benefit is longer viewing time
  • 70% of marketers who use interactive video believe it performs well or very well

Source: Demand Metric Interactive Video Report

One of the key questions we are often asked is, “What types of interactive elements we should add to our videos?” The answer? It really depends on your goals.

Your interactive videos should have specific goals whether it’s for training or pitching a new product. Each piece of interactivity is both a way to encourage your viewer to take an action that helps you reach your goal, as well as a potential data point for you to understand who your target viewer is and that individual’s needs and pain points.

Three Steps to Add Interactive Video Elements

1. Chapterize Long-form Video Content

Chapterization of your video content will provide your viewers with easy navigation so they can find the relevant content they need, very quickly. For example, if you send your contacts a video about a particular event and there are different sessions during this event, give your viewer the control to quickly find the specific session they are interested in and learn more about it.

Additionally, this information can also inform your marketing team as to what pieces of content you should produce in the future. Video analytics mined from interactive elements create a more complete feedback loop—you now know what interests prospects and customers.

2. Create Clickable CTAs

Keep in mind that video is just one component of your overall marketing strategy. So whatever end goal you have—whether it is to learn about a new product, sign up for an event, or download content—you need to add a CTA to your video to drive viewers and interest towards that goal.

There are a couple of different ways to do this. The first is to include an end screen, indicating what the viewer should do next and leading them to a desired action. While you can place a screen over your video at any point, it’s not recommended during the video itself, because it obscures your video and the viewer may stop watching.

A pop-up annotation, however, is great during the video itself. Annotations are clickable, customizable text or links that you layer on top of your video. Annotations typically appear as small button-like CTA’s. With an annotation, viewers stay on your video content and are able to engage with your brand through the actual video content itself.

Multiple annotations can be used to provide your viewer choices. However you decide to format it, always point your video viewer to the next point of “conversation” with your brand. Otherwise, it is very likely that they would leave after watching your video without taking any next step.

3. Insert a Quiz

Inserting a quiz in your video has a couple of different benefits.

First, if your video is educational in nature or training-based, you can test the knowledge of your viewers. Additionally, you can assess if audiences have engaged with the content, and if they are ultimately learning what they need to—this is particularly important for internal employee training.

Second, if your video is more marketing focused, these quizzes keep attention on your messages longer while allowing you to get more information on your viewers and their interests. Consider adding this data to your marketing automation and CRM tools so you can not only build your lead database but add this data into campaigns so you can make your lead generation goals.

Again, where you take interactive video really depends on your goals. Using interactivity with marketing automation allows for personalized content and more intelligent digital conversations with prospects and leads. Chances are, you’re already mapping content to an individual’s or persona’s needs and pain points.

Have a chat with your sales and account management teams to find out commonly asked questions and build-out a custom experience in which interactivity is layered on existing assets. How can interactivity take your content further? The time is now to start experimenting and find out.

POWERFUL TOOLS FOR LIVE EVENTS AND 24/7 CHANNELS

Live streaming at scale is inherently complicated, requiring a careful orchestration of hardware, encoding services, and distribution platforms, with a narrow (and often unforgiving) margin for error. Getting an event or service up and running is a daunting task, so many turn to off-the-shelf streaming platforms and tools that have solved many of these basic challenges.

However, as users (especially in large organizations) have noticed, these products often lack advanced features to integrate into your existing video streaming ecosystem, protect and monetize your content, or accelerate content creation and VOD publishing. They’re also expensive, though not nearly as expensive as building your own.

We saw an opportunity to build a better solution: Brightcove Live. It’s a resilient, cost-effective, API-driven platform built specifically for media organizations and enterprises. It’s a ground-up redesign of Zencoder Live, bringing a host of new features, such as 24/7 streaming, server-side ad insertion (SSAI), cloud DVR, content protection, on-the-fly live clipping and live-to-VOD asset creation.

Instantly Clip Live-to-VOD

Whether you’re streaming 24/7 or putting on live events, creating VOD highlights of your content is often part of the plan. Usually, this involves an entirely separate workflow from the live stream, and getting clips posted quickly requires a costly on-site editorial team. With Brightcove Live, you can instantly lift clips out of your live stream with a single API call while your stream is still on the air. Brightcove Live will ingest clips directly into Video Cloud, or upload to an S3 or FTP location of your choice, for immediate site publication or social media sharing.

Brightcove Live also streamlines the process of publishing an entire live event as VOD, and has already saved customers like NHRA and Seven West Media time and resources.

“The NHRA uses Brightcove Live for our NHRA All Access product and are impressed with the quality and reliability of the stream.  We’ve especially enjoyed the ease of transferring the live asset to on-demand after an event ends as it saves us hours of work each race weekend” (Pam Allison, Director, Digital Products at NHRA).

Seven West Media utilized Brightcove Live’s VOD clipping feature while still in beta for their coverage of the 2017 Australian Open, enabling them to turn around the final clashes in minutes instead of hours. For example, the Williams sisters’ entire 90-minute final match was published just 20 minutes after it ended.

Increase your Reach with SSAI

Traditional client-side ad insertion is tricky to implement across multiple platforms and can cause glitchy playback, leading viewers to abandon playback sessions. By injecting ads before the stream reaches the client, server-side ad insertion (SSAI) works across all devices, eliminates ad-playback glitches, and helps to mitigate ad blocking technologies.

With DoubleClick for Publishers, FreeWheel, or any VAST 2.0/3.0/4.0–compliant ad server, Brightcove Live seamlessly inserts ads into the stream before delivery to the player, improving playback performance and reach. Ads can be cued via OnCuePoint messages embedded in the input stream, or you can use the REST API for both scheduled and instantaneous (a.k.a. “big red button”) ad cues. Ad insertion is frame-accurate, and you can even specify a custom video slate to show viewers when an ad slot isn’t filled.

Protect Your Content

Brightcove Live also provides tools to protect sensitive or confidential content. We’re supporting HLSe encrypted streams at launch, with support for the major DRM systems coming soon. Playlists and chunks can also be delivered via SSL for additional transport-layer security, and token authentication is supported for Akamai Edge Auth 2.0.

Built for Scale

Brightcove Live is available in multiple regions across the globe, which helps you to improve resiliency and latency by provisioning streams closer to your live source. Streams are delivered to viewers via HLS, ensuring compatibility with a wide variety of platforms and players, as well as most popular CDNs.

Managing growth and configuration are two of the biggest challenges when you’re spinning up a live streaming solution, but Brightcove Live’s API-centric approach makes this simple. All streaming options are set per-job, so you can change settings or add redundant streams with a single API call to create a new job. Stream status, VOD clipping, and SSAI are all controlled via API for easy integration with your existing tools.

Live streaming is hard, but it doesn’t have to be. We’ve taken care of the hard part, and we’re excited to see how you’ll use Brightcove Live to make live streaming work for you.

LIVE STREAMING FORMAT OF THE FUTURE

Live streaming at scale is inherently complicated, requiring a careful orchestration of hardware, encoding services, and distribution platforms, with a narrow (and often unforgiving) margin for error. Getting an event or service up and running is a daunting task, so many turn to off-the-shelf streaming platforms and tools that have solved many of these basic challenges.

However, as users (especially in large organizations) have noticed, these products often lack advanced features to integrate into your existing video streaming ecosystem, protect and monetize your content, or accelerate content creation and VOD publishing. They’re also expensive, though not nearly as expensive as building your own.

We saw an opportunity to build a better solution: Brightcove Live. It’s a resilient, cost-effective, API-driven platform built specifically for media organizations and enterprises. It’s a ground-up redesign of Zencoder Live, bringing a host of new features, such as 24/7 streaming, server-side ad insertion (SSAI), cloud DVR, content protection, on-the-fly live clipping and live-to-VOD asset creation.

Instantly Clip Live-to-VOD

Whether you’re streaming 24/7 or putting on live events, creating VOD highlights of your content is often part of the plan. Usually, this involves an entirely separate workflow from the live stream, and getting clips posted quickly requires a costly on-site editorial team. With Brightcove Live, you can instantly lift clips out of your live stream with a single API call while your stream is still on the air. Brightcove Live will ingest clips directly into Video Cloud, or upload to an S3 or FTP location of your choice, for immediate site publication or social media sharing.

Brightcove Live also streamlines the process of publishing an entire live event as VOD, and has already saved customers like NHRA and Seven West Media time and resources.

“The NHRA uses Brightcove Live for our NHRA All Access product and are impressed with the quality and reliability of the stream.  We’ve especially enjoyed the ease of transferring the live asset to on-demand after an event ends as it saves us hours of work each race weekend” (Pam Allison, Director, Digital Products at NHRA).

Seven West Media utilized Brightcove Live’s VOD clipping feature while still in beta for their coverage of the 2017 Australian Open, enabling them to turn around the final clashes in minutes instead of hours. For example, the Williams sisters’ entire 90-minute final match was published just 20 minutes after it ended.

Increase your Reach with SSAI

Traditional client-side ad insertion is tricky to implement across multiple platforms and can cause glitchy playback, leading viewers to abandon playback sessions. By injecting ads before the stream reaches the client, server-side ad insertion (SSAI) works across all devices, eliminates ad-playback glitches, and helps to mitigate ad blocking technologies.

With DoubleClick for Publishers, FreeWheel, or any VAST 2.0/3.0/4.0–compliant ad server, Brightcove Live seamlessly inserts ads into the stream before delivery to the player, improving playback performance and reach. Ads can be cued via OnCuePoint messages embedded in the input stream, or you can use the REST API for both scheduled and instantaneous (a.k.a. “big red button”) ad cues. Ad insertion is frame-accurate, and you can even specify a custom video slate to show viewers when an ad slot isn’t filled.

Protect Your Content

Brightcove Live also provides tools to protect sensitive or confidential content. We’re supporting HLSe encrypted streams at launch, with support for the major DRM systems coming soon. Playlists and chunks can also be delivered via SSL for additional transport-layer security, and token authentication is supported for Akamai Edge Auth 2.0.

Built for Scale

Brightcove Live is available in multiple regions across the globe, which helps you to improve resiliency and latency by provisioning streams closer to your live source. Streams are delivered to viewers via HLS, ensuring compatibility with a wide variety of platforms and players, as well as most popular CDNs.

Managing growth and configuration are two of the biggest challenges when you’re spinning up a live streaming solution, but Brightcove Live’s API-centric approach makes this simple. All streaming options are set per-job, so you can change settings or add redundant streams with a single API call to create a new job. Stream status, VOD clipping, and SSAI are all controlled via API for easy integration with your existing tools.

Live streaming is hard, but it doesn’t have to be. We’ve taken care of the hard part, and we’re excited to see how you’ll use Brightcove Live to make live streaming work for you.

INTEGRATING VIDEO WITH YOUR TECH STACK

Today’s marketers and communicators are focusing holistically on the viewer experience. Companies of all kinds are realizing they have to build architectures that marry content with data and deliver experiences that compel and delight their audience.

“Platforms that knit together to help form this unified customer experience. And those are platforms that should be used in every organization, all the way through the organization, to deliver that wonderful customer experience. So those are the purchases that should be centralized. Everybody should be using the same CRM, the same marketing automation platform, the same video platform, so you’re able to knit these things together and create that great experience.” – Anita Brearton, Founder/CEO CabinetM

When you integrate your online video platform (OVP) with your existing tech stack, like your CMS, MAP, and CRM, it ensures your company can make the most of your video investment. Workflows are streamlined, experiences are heightened, and marketers can now focus on building long-term personal relationships with customers and prospects.

Furthermore, when cross-enterprise video platforms are integrated with eCDNs and single sign on (SSO), it allows for IT, HR and other internal communications to utilize these same system pathways.

Below, we’ll discuss the various ways in which video can be integrated into your company’s technical ecosystem.

Connecting Your CMS and OVP

Managing a content strategy can be overwhelming, as can putting all that content in one place. Video communicators and strategists at all levels of a company spend much of their day pulling assets from numerous systems and working with many internal collaborators.

Creating an efficient content workflow and maintaining an asset library that works across various systems is absolutely vital. So what do you have to gain by integrating your OVP into your CMS? When video flows freely to web publishers via connectors and/or media management APIs from your OVP to your CMS, video becomes accessible to every person in your organization who publishes content.

The OVP and CMS connection also opens the door to dynamic publishing based on tags, and adding video results to search on your website. Video is now an integral part of your digital marketing and internal communication workflows and not isolated from it. Now let’s look at how video can perform in your marketing campaigns.

Integrating Video Data into Your Marketing Automation Platform

Marketing automation gives marketers a complete picture of an individual prospect or customer, leveraging the digital interactions monitored through your CMS, and now, OVP. Marketing automation allows you to utilize the analytics from both platforms to send content based on individual interests, delivering the right content to the right person at the right time. Strategically placed video increases email opens, CTRs, and landing page conversion, boosting your lead generation.

You can also gather leads via MAP-specific and/or progressive profiling forms placed before, during, or after a video viewing. Again, the video data pushed into your MAP helps you qualify, segment, and nurture those leads. By integrating video and marketing automation platforms, you can take much greater control of your marketing efforts and increase ROI.

Pulling Video Analytics and Content Preferences into Your CRM

CRMs empower conversations, bridging the gap between marketing and sales with information. CRMs are powered by the rich data provided by your OVP, CMS, and marketing automation. By integrating your OVP with your marketing automation and CRM platforms, you create customer interactions with the sales team that are more targeted, efficient, and effective for all. Sales reps love a complete profile.

Because of the data flowing between these systems, it will be clear what videos were watched, how much of the content was consumed, what additional content was sent via marketing automation, and lastly, when in these marketing efforts the individual was qualified as a sales-ready lead. All this information personalizes sales follow-up, creating a better experience for your prospect and leading to more conversions and upsells for your sales team.

Streamlining Security with SSO and eCDN

Internal communicators may not have the broad tech stack needs of marketers aligning their video marketing across multiple channels and campaigns, but internal comms can present it’s own set of unique challenges. An important partner in your tech stack ecosystem, IT, needs to make sure that internal-only communications stay that way—secure and accessible only to an internal audience (employees, franchise owners, partners, and more).

A single sign-on (SSO) integration enables select groups of employees to view video seamlessly without having to go to a new site and enter a special password. This all takes place behind the firewall. SSO also integrates video with your existing user management solution, giving IT, HR and anyone else who manages company communications, centralized control over who has access to what video content.

By integrating your video platform with an eCDN (enterprise content delivery network) you ensure internal video viewers can simultaneously watch live or VOD streams without plugging up the company network. eCDNs let you minimize your bandwidth usage, latency, and buffering, which means your content is delivered in highest resolution and plays to the highest standards, without clogging up the intranet.

When you have a company of 10,000 employees, you can imagine the network strain of everyone watching the CEO’s live town hall. eCDN and OVP integration means you can concentrate on the content you’re delivering, without worrying about bringing down the corporate network.

Reporting on Video Analytics and Campaign Success

The marriage of content and data comes together with analytics. Marketers and communicators, and sales teams love data, but who doesn’t? Video metrics are one of the most insightful tools for determining the value of campaigns and singular communications.

The analytics that flow through integrated platforms will allow you to understand how video content is performing, which you can share with web development, business intelligence, and sales teams. Tech stack integrations help us to align both external video marketing campaigns and internal communications with business goals and results, demonstrating ROI.

“We’re not spending the time as marketers to think thoughtfully about not only the technology that we’re going to use, but the integration with all the other pieces of technology out there and what are the other departments that need to leverage that?” – Joe Pulizzi, Founder, Content Marketing Institute

Marketers and internal communicators crave the creativity and business results of video, but also look for efficient workflows. That’s where a little knowledge of tech stacks comes in handy. We don’t need to be fluent in things like RESTful APIs and webhooks—it just needs to work.

With the right integrations, you get to 1) create memorable experiences for employees, prospects, and customers, 2) make IT happy with higher utilization of of existing platforms throughout the digital and marketing stack, and that all leads to 3) the creation of revenue for your company and greater ROI across the board.

9 SOCIAL VIDEO BEST PRACTICES FROM REAL INFLUENCERS

Social media, in a lot of ways, is about being benevolent, helpful, and genuine. This is how some accounts attract thousands of loyal followers—these influencers embody these “golden rules” of social media.

So what do you do if you’re an influencer and you’re asked about how to best utilize social media and social video as a marketer? Share the wealth, of course. Read below to learn more of our Video Marketing Mentors’ advice.

1. Don’t Be Everywhere, Be Where Your Audience Is

Chris Moody, Content Marketing Leader at GE Digital: “I think the most important thing with social today, and going forward, is to be at one place at one time. So many times we’re trying to be on Facebook, Twitter, Instagram, Snapchat, Pinterest, LinkedIn. We can’t be everywhere. Our audience is not everywhere. And when you’re stretching yourself so thin, it’s going to water down what you’re actually doing on social. So find the place where your people are, your prospects, your customers, your advocates. Be there, and do a great job of producing content there and engaging with folks.”

2. Create a Communication Strategy for Each Social Site

Joe Pulizzi, Founder of Content Marketing Institute: “Every channel that you leverage should have its own ‘why.’ So strategically, why are we communicating on that channel? What is the audience that we’re communicating to? And what is the ultimate behavior we’d like to see? So you should do a ‘why’ exercise with every channel you use. Right now the average enterprise engages in per audience between 13 and 16 different channels. That’s too many.”

3. Start with the Buyer and Tailor Social Content to Them

Carlos Hidalgo, CEO of VisumCx: “I have connected with a firm in Europe, who is actually using social specifically, and that’s all they do. But they’re working with brands like Fujitsu, and IBM, and Vodafone to really say social media—if you wanna demand gen, we can really help spur that on from a social media perspective. And they’re having great success with it, because they start with the buyer. What does the buyer like on social media? What social media properties are they on? What kind of content do they wanna consume?”

4. Add Visual Interest to Your Standard Tweet

Chris Moody: “Social media posts with animated GIFs or video are nine times more effective than those that do not have animated GIFs or video.”

5. Keep Social Video Short and Action-Driven

Stacy Adams, Head of Marketing at GoAnimate: “Social video should be short. Social video should encapsulate very quick, concise points, and should point to something else. Video for video’s sake I think doesn’t do anything to enhance your brand, and what’s your call to action for that video.”

6. Use a Video Platform You Can Control

Joe Pulizzi: “So what is the platform that you’re going to have for the video so that you’re not playing by somebody else’s rules? So I would like to see the video at least the ultimate home for it be on something that you can control. Because YouTube changes our rules, Facebook changes our rules, and they will continue to because they don’t care about what you’re doing, they only care about what they’re doing.”

7. Make an Owned Content Hub

Michael Brenner, CEO of Marketing Insider Group: “I think it’s a real mistake for brands to focus on creating satellites of content in social platforms because as we’ve seen Facebook can change the algorithm and you see organic reach on Facebook go from 100 percent of the people that follow your brand, seeing your content, to now it’s less than 1 percent. So I think the real focus is really focusing on creating a core owned piece of digital property or content marketing program and then looking at social platforms as mechanisms of distribution.”

8. Tailor Content to Where Consumption is Taking Place

Stacy Adams: “A lot of success can be had by taking a video and putting different components of it in different places using a longer-form video on your website where people are there, they’re visiting, they have a little bit of time.”

9. And Whatever You Do, Don’t Use Social Media as a Modern-Day Billboard

Jeff Julian, Co-Founder of Enterprise Marketer: “I still go back to, ‘What is at home? What are your customers seeing when they get to your homepage? What kind of platforms are you immersing into the experience of mobile devices on your website?’ Start there, and then look at the social networks as ways to amplify and be a part of the conversation, not just the broadcast message where we all walk outside and throw our billboard up there. Instead, say, ‘Okay, how can we have a platform that’s integrated?’ That’s easy for us to reuse and use in our platform, and it’s seamless, and gives the customers an amazing experience.”

DIGITAL RIGHTS MANAGEMENT (DRM) IN DYNAMIC DELIVERY

Dynamic Delivery brings many benefits to Brightcove, including greater device reach, distributed ingestion and delivery, reduced storage costs, and greater CDN flexibility and security. This post specifically addresses how Dynamic Delivery simplifies the challenges faced around delivering DRM protected content across a range of platforms that necessitate unique combinations of streaming and DRM formats.

Introduction

We all want video to just work and play back everywhere. For non-premium content, this is relatively straightforward. But as soon as you add more advanced requirements like DRM, closed captioning, subtitles, and multiple audio tracks for different languages and audio descriptions, video delivery across different platforms becomes really complex.

The landscape of end-points (web browsers, smartphones, tablets, connected TVs, and streaming boxes) is ever-changing. This makes video delivery hard because for an optimal playback experience, the endpoints frequently require different combinations of video codecs, packaging formats, and DRM systems. There is no standard combination of settings that will work on all devices, and since many of these systems are competing with each other, we don’t see one coming any time soon. For example, an HLS stream protected with FairPlay DRM for an Apple TV will not playback on an Android device.

Until now, packaging video to support a wide range of endpoints has meant creating versions of the same content for each endpoint, or using a multi-DRM solution. Creating different versions for each endpoint means that the processing and storage requirements are ever growing, and they start to increase exponentially if you add different captions and languages.

Multi-DRM solutions have their own challenges and do not work well in situations where a mobile web or device native streaming solution is needed. When new media formats are introduced, or format specifications change, these packages need to be updated or recreated.

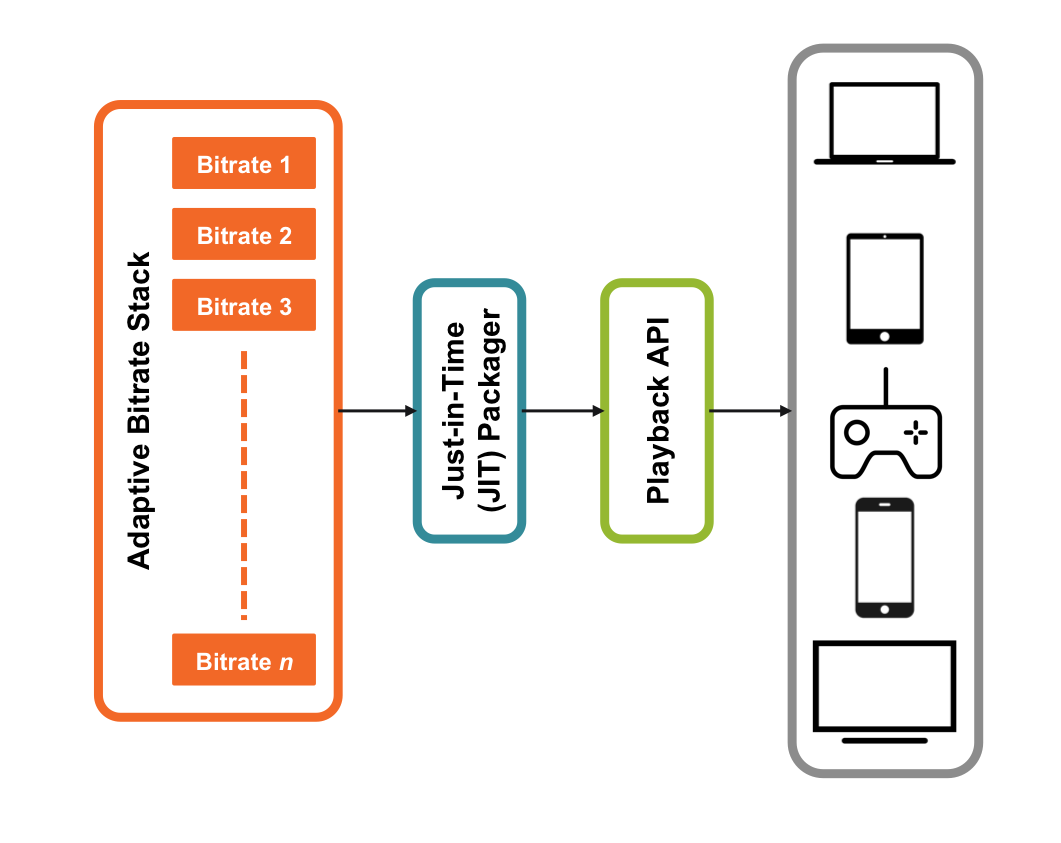
That’s where Dynamic Delivery comes in. Instead of creating multiple versions of the same content for each endpoint, we create the right version dynamically as needed through “just-in-time” packaging. This way, there’s no additional storage required and we can easily support new formats as needed.

Benefits

Dynamic Delivery can help manage the proliferation of delivery formats in the following ways:

  • Reduced storage footprint. This is achieved by storing your renditions once and generating downstream formats on-the-fly for delivery as needed.
  • Device reach and support. Just-in-time packaging generates renditions based on the device requesting the content, automatically selecting the appropriate packaging and DRM formats. This greatly reduces the cost and effort to  accommodate future devices and formats.

Configuration Steps

Though Dynamic Delivery has greatly reduced the complexity of delivering content using DRM, there some steps to get up and running.

First, you’ll need to ask your Brightcove account manager about enabling DRM on your account. If you plan to deliver content to iOS devices (including Apple TV), you will need to obtain a production ready FairPlay Deployment Package from Apple. The package will include the following 4 key pieces of information, which you will need to provide to Brightcove Customer Support:

  • CSR (Certificate Signing Request). A small file with a .csr extension
  • ASK (Application Secret Key). A 128-bit plaintext hex key that Apple provides
  • Certificate. Typically a file with a .der or .cer extension.
  • Key (Standard Private Key). Stored in a file with a .pem extension.

Even if you’re testing your Fairplay implementation on iOS devices in a Test or QA environment, you will need a production certificate from Apple to ensure successful ingest and playback.

Once your account is set up for DRM, ingest your source file using Dynamic Ingest and specify a Dynamic Delivery-enabled ingest profile. For example, if your ingest profile included 360@600kbps, 720p@1200kbps and 720p@2000kbps renditions, a single set of 3 fragmented MP4 renditions will be stored. Dynamic Delivery will automatically package these renditions for DRM-enabled endpoints that support the following formats:

  • DASH-CENC with Google Widevine Modular or Microsoft PlayReady
  • Smooth with Microsoft PlayReady
  • HLS with Apple FairPlay

The diagram below illustrates the concept of the single storage format and just-in-time packaging:

Diagram illustrating the single storage format and just-in-time packaging used with DRM

Playback testing is required on popular desktop browsers (in most cases natively without browser plugins such as Silverlight & Flash) and any iOS or Android Apps where you need to deliver protected content. If you are using the Brightcove Player and SDKs, make sure you configure your DRM settings.

Once your account is enabled for DRM, all of your titles will be delivered using DRM protection by default. If you need to make exceptions by delivering some titles in your DRM enabled account without DRM, this can be done by either of the following:

  • Set the “drm_disabled” flag to true using Video Cloud CMS API during or after ingest
  • In Video Cloud Studio, use the DRM toggle on a title to turn off DRM.

This toggle is only available on accounts enabled for DRM.

We support a variety of policy settings to meet requirements set forth by your content providers. If you have custom settings for license policy restrictions on how your content should be played, speak to your Account Manager for more details.

5 EASY WAYS TO JUMPSTART YOUR VIDEO MARKETING

Where to begin? This seems to be the top question marketers have about video. The best advice I have is, “begin where you are.” Think of video as one of the mightiest tools in your marketing toolbox, and start using it with your existing strategies. For example, if you already have a great nurture campaign in place, add video to one or more of your emails. Or if you’re targeting prospects through Facebook advertising, switch out your text-based ad for a video rich equivalent. When getting started, assess what content could be more effective if delivered or enhanced with video, and make the switch.

1. Video Content Management is Key

Back End Organization – For Your Sanity

First things first, you need to get organized. Not only will launching a marketing campaign with video feel less daunting, but you’ll set the proper foundation for continued success, particularly as your use of video continues to grow. With Cisco stating that over 80% of internet traffic will be video by 2019, it’s safe to say your video libraries will be growing. Whether you have just two videos now or you’ve inherited a collection, assume exponential growth once you’re up and running.

  • Find and discover videos. Assess what video assets already exist. Talk to your web team, and with teams within marketing, sales, customer success, and HR. Search your company name and “video,” and see what comes up. It’s often surprising what content exists in disparate parts of the web. Could you repurpose this pre-existing content? If so, do it.

  • Get tagging. And don’t do it in a silo, marry your video taxonomy to your company’s existing taxonomy. Using a common language for tagging and taxonomy ensures your video content is easily found internally for use, and that it’s referenced consistently in campaigns and programs.

  • File wisely. I could write an entire post on choosing the right online video platform (OVP) for your needs, but for purposes of this topic, I’ll just say you’ll want to organize your content so you can find it once you have 10x, 20x, 100x your current video library size. I ran video strategy at one enterprise company and video marketing at another, both with sizable video libraries, and I found a platform with folders that allowed my team to organize the growing libraries was the trick to sanity. And no, Google Drive isn’t going to cut it.

Front End Organization

So you’ve organized things all nice and neat for yourself. Excellent! Now do the same for your viewers. There’s no point spending resources and budget on content if no one can find it. So make your videos not only findable, but put them in context for the viewer. This can take many forms.

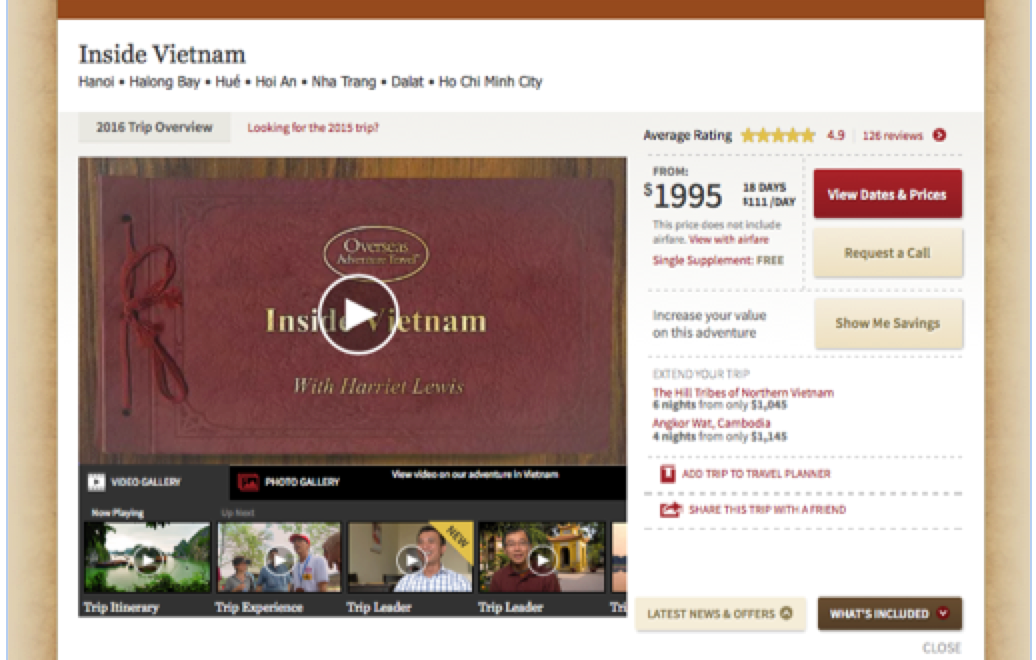
  • Curate playlists. If you have a specific collection of videos or a specific sequence of video content, playlists work well. One of our travel customers, Overseas Adventure Travel, has done this well. In addition to an overview video on the Vietnam destination, the playlist player includes videos on the trip itinerary, exploration, and introductions to the guides – giving a detailed overview of the both the trip and the experience for the traveler. All the information a potential traveler could want is at their fingertips.

Curated Playlist

  • Create smart playlists. Smart playlists are a great option for evergreen or long-termed webpages where you want to continue to up-level content about a specific topic. In building a video hub or central resource, you can set a playlist to pull in all content for a specific tag or tags (see what I mean about tagging being essential?) For example, if your company has a B2C solutions page, you can set the playlist to pull in videos tagged with both “B2C” and “product solutions.” After easily creating your first iteration, new content will always be added dynamically to this playlist, ensuring the page doesn’t become stale and  your team doesn’t have to constantly monitor or update the content.

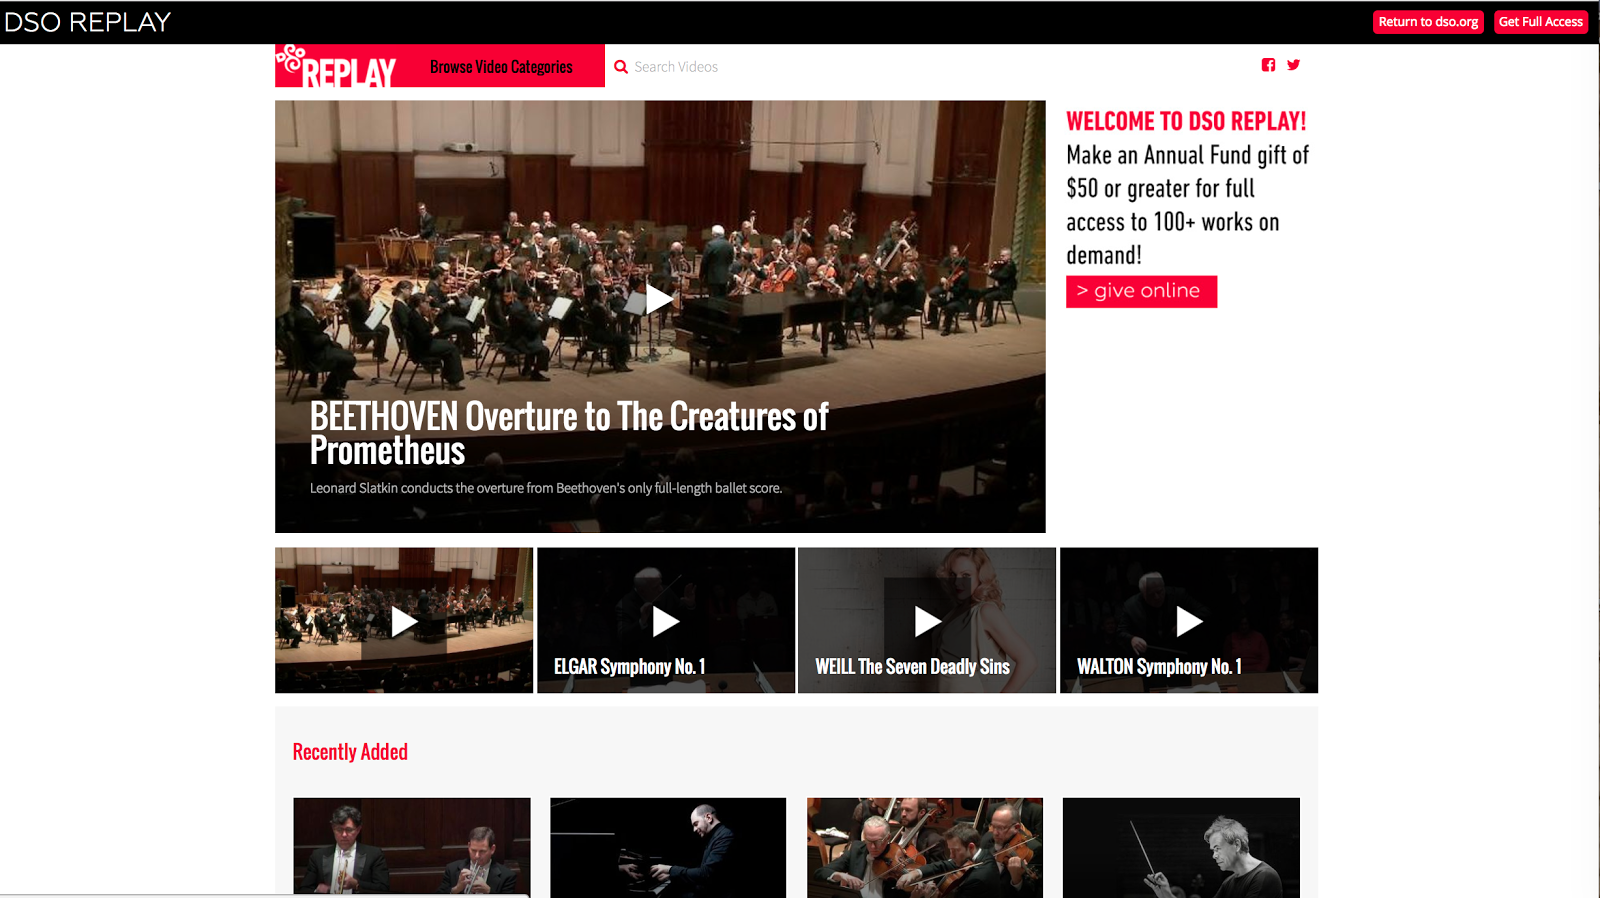
  • Immerse the viewer in video galleries. In our Video Marketing Academy, Joe Pulizzi of Content Marketing Institute gave us this insight when speaking about video and content marketing: “if we’re going to make an impact we need to do what media companies have been doing year after year, decade after decade, and that’s creating consistent valuable content experiences…tell the story over a long period of time and build an audience.” If you are inspired to follow that advice, you will be creating an expansive series of videos for your audiences. These can all live in hubs or video galleries that allow for an immersive brand experience, streaming episodic online content. Make sure these live on your website, match the look and feel of your brand, and are searchable. Additionally, if you’d like to use video galleries to work with your existing campaigns, consider where and how you’ll add CTAs. While CTAs for each individual video are a great idea, a video collection may require a holistic CTA. Thus you’ll also want to consider a page-level CTA, flanking your content, to reflect the next step of a longer story your videos have told.

Detroit Symphony Orchestra video gallery

For example, Detroit Symphony Orchestra uses their gallery of videos as part of a subscription push, asking the viewer to donate to receive access to symphony performances online. They created this program after lack of funding caused them to close early in the season a few years back. Funds from this subscription have helped the organization keep their doors open ever since.

2. Integrate Video into Email Campaigns

Now that you’re organized, it’s time to get started marrying your video to your existing marketing strategies. Marketers agree, email is still pretty darned effective. Video, however, makes it even MORE effective. Studies show video increases key email metrics including a 19% increase in open rates, 65% increase in CTRs, and 26% reduction in unsubscribes. Here are a few key things you need to know about including video in email campaigns.

  • DO put the word “video” in your email subject line– it increases open rates

  • DON’T embed your video file in the email– most email clients won’t support it

  • DO choose a compelling thumbnail image– pique interest and increase click-throughs.

3. Use Video on Landing Pages

Video landing pages enhance the user experience and provide more efficiency for marketers. If you’ve integrated video into your email campaigns, as we covered above, here are three steps to keep your reader engaged and drive immersion through video.

  • Place your video prominently on the page. If your email promised video, then deliver a video-centric landing page.

  • Use autoplay. In this case, video autoplay lets the viewer know they’re in the right location because the transition from email to landing page is seamless.

  • Avoid clutter and emphasize your CTA. Your objective should be clear, the next step to your visitor, easy. Your copy should be minimal, use your video to convey the broader picture, ensuring viewers stay on the page and don’t click to another location. Whether you’re looking for a trial sign up or purchase, push to your CTA, utilizing forms within the video itself.

When created properly, landing pages optimized with video can garner 4x the lead conversion of unoptimized landing pages.

4. Collect Leads With Video

While there is a never ending battle in the marketing ranks on the “gate or no gate” issue, where would the marketing practice be without lead gen to prove our worth to the c-level? Video gating (placing content behind a lead form) can be an easy win when you start video marketing. An OVP with built-in lead forms that feed into your marketing automation and CRM platforms makes your videos work that much harder for you. If you have video content compelling enough to warrant asking someone to give you their contact information, then that’s the video you’ll want to test gating.

Video gives you the opportunity to choose how much you want to give away before asking for “payment”—in this case, contact information. In other words, you can gate at the head of a video, in the middle, or at the end. Middle gates are very effective when you’ve built up a great story that resolves after the gate. An end gate, however, is a great way to judge if you’ve created the content the viewer needed. If someone watches all the way through your video and then gives you their information, you can appropriately elevate them in your lead scoring model.

5. Add Interactivity to Videos

Marketers know what it’s like to speak into a void. We’re all looking to create an effective dialogue with our audiences, and interactive videos are the fastest and most effective way to create this feedback loop. Ensure your video is gathering information while delivering what the viewer is looking to learn by using quizzes, story branching, hot spots, assessments, and calculations. In-video appointment scheduling is another way to put the viewer in control and is a favorite of demand gen and sales teams.

Perhaps you’re just getting started with video, but that’s no reason to leave easy-to-build interactive options on the table! After all, 70% of interactive video users indicate that interactive video engages audiences well or very well. So, what are some easy ways to get started with interactive video? Try refreshing your existing video by adding interactivity.

  • Is it a long video? Add chapterization to help the viewers navigate to the sections that interest them. The data from chapter viewing will also help you plan for topics for future videos.

  • Do you have specific next step for the viewer? Add a CTA to download the next logical piece of content in a customer journey. Interactivity can create bridges between your resources.

  • Is your offer time-sensitive? Consider marrying videos to your events.  Creating a video that promotes your event presence while offering the ability to schedule one-on-one meetings on-site, and/or enter in a contest. All three of these offers will increase booth traffic, and if done properly, drive conversions.

As you tackle this project, find an existing video that you can repurpose to add to your campaigns, integrating it into an email/landing page combination. Or instead of testing channels, test content. Choose an existing video and add one piece of interactivity to it and see how that one move affects your test video’s performance. As I say over and over to people who ask me about video strategy, it’s not about producing more videos or slapping it up on a homepage, it’s about making video work harder for you in your current marketing efforts.