It’s always interesting to explore how Brightcove customers are utilizing our technology and realizing measurable benefits from their implementations. It was particularly fun to learn more about how Avid Technology is using Brightcove since our world is intrinsically linked to theirs. While we help customers deliver and manage online video content, Avid is often the creative tool used in the video development process.
Avid, another Massachusetts-based company, specializes in video and audio production technology—specifically, digital non-linear editing systems, management and distribution services. Creative professionals from Hollywood to Madison Avenue rely upon Avid’s suite of products to fulfill their visual storytelling needs. Since Avid’s 1987 launch, its technology innovations have earned it hundreds of awards, including two Oscars, a Grammy and 14 Emmys. The company certainly wields “video cred.”
So what led Avid to Brightcove? Though Avid is an expert on the video development front, it sought outside expertise for video distribution best practices. Our customer case study discusses the Avid/Brightcove relationship in further detail, but we wanted to use this post to offer a brief synopsis.
Essentially, Avid’s path to online video dates to the spring of 2010, when the company began to investigate live webcasting options, including video. Ultimately, Avid assembled a DIY, Flash-based webcasting solution that incorporated both chat and video for an interactive experience. With this knowledge in-hand, the company began to research online video platforms that would provide additional, on-demand viewing capabilities—and also help the company grow into additional educational video functionality moving forward.
In March 2012, Avid selected Brightcove as its online video platform of record. Since then, the company has integrated video into its website help offerings—directing users to tutorial video content when they are working within Avid software and a question arises. Currently, the Avid team is working to migrate its video content marketing assets to Video Cloud so that they can be easily organized and managed as well as optimized for mobile devices. In the future, Avid plans to take advantage of Brightcove to improve video-driven SEO and add user-generated content to its website.
We’ve written at length about the role that online video plays in the content marketing ecosystem in helping brands build lasting relationships with their customers. PUMA, one of the most well known footwear and apparel brands in the world, is a great example of a marketer that understands the power of video and how it helps to increase engagement with customers.
PUMA produces and publishes a wide range of video content around the world to support its products but also to bring customers on a journey. While PUMA is known for its cutting-edge products, its brand really comes alive through the context that the company puts the products in and the lifestyle that the brand portrays. PUMA looks to video as an opportunity for engagement and a way to direct customers to a cadence-specific, multi-screen experience.
This strategy was put to great use at the 2012 London Olympics, where PUMA created an entire brand environment for its customers to interact with both in person and remotely through live video content, with events and content timed around PUMA-sponsored Jamaican sprinter, Usain Bolt, and his epic performances in the 100 and 200 meters.
We recently sat down with Jay Basnight, head of digital strategy at PUMA, to learn more about the company’s video strategy and the impact of video in driving engagement. Jay talks in detail about the importance of video and how PUMA measures success, as well as how the company uses the Brightcove video platform to support its video efforts around the world.
At Brightcove, we use Salesforce to manage our customer information. Our sales, account management, support and finance teams also use it for various activities such as contacting sales leads, tracking support cases, and generating usage reports. It’s important for our business to keep pushing customer data into Salesforce in a timely and reliable way.
The data model for our products supports a many-to-many relationship between users and accounts. An account object represents an organization or a department within a large organization, and a user object represents an individual who works for one or multiple organizations. In Salesforce, we customize the built-in Contact object to represent each user of Brightcove services and we define a custom object called BCAccount to represent an account (see figure 1).
Figure 1. Data Model in Brightcove Service and Salesforce
Several years ago we built the data synchronization feature using the Salesforce SOAP API and quartz, and we have seen some problems with this implementation. There are two major difficulties:
It is too chatty, which makes it slow. Only 700 objects can be synchronized to Salesforce per hour.
It requires a lot of effort to make any changes to the data model. To add a new field to an object, it forces us to export a new WSDL file from Salesforce and generate Java classes from the WSDL file.
In light of these difficulties, we decided to build a new synchronization system using the Salesforce bulk API and Apex code. The new implementation consists of a data pushing engine called RedLine and a set of Salesforce Apex classes to process bulk data pushed from RedLine.
Figure 2. New Data Synchronization
RedLine is built using Sinatra, a lightweight ruby web server, as a standalone service independent from the other Brightcove services. RedLine uses the rufus scheduler to periodically query object creates, updates and deletes from Brightcove via RESTful APIs. Then RedLine transforms JSON response to CSV and sends to Salesforce as bulk request. Salesforce has a limit of 10,000 objects per bulk request, which is enough for our usage. Since bulk request is processed asynchronously in Salesforce, neither any of the Brightcove services nor RedLine needs to wait after sending data to Salesforce.
We wrote a few Apex classes to process bulk requests, including adapting the user and account objects to the Salesforce objects, and then deployed the Apex classes to Salesforce and scheduled Apex batch jobs to run these classes once data arrives as bulk request. In this way, no code exists in Brightcove services for the Salesforce data model and only Salesforce Apex code needs to deal with Salesforce data model. Salesforce provides a set of monitoring tools for both bulk request and Apex batch job.
If there are any errors during the processing of a bulk request, we can easily see them in the Salesforce Web UI. We also deployed an Apex class which runs periodically to check whether a bulk request arrives in an expected frequency, and alerts if a request has not arrived for a while.
In the new synchronization system, to release a change of new fields of user or account object we just need to add the new fields in the Salesforce custom object and then expose the new fields in the JSON response of the Brightcove service API. We don’t need to change or restart RedLine for object format change since RedLine is smart enough to convert the new fields in JSON as new columns in CSV in bulk requests.
There have been four changes to account objects and one change to user objects, and we didn’t have to change a line of RedLine code for these changes. For the old SOAP API based synchronization system, it used to take us one to two weeks to synchronize a new field for user or account objects.
After running this new synchronization application in production for 8 months, we have seen it handle a couple of burst data changes gracefully. Recently a batch change of 900 accounts was made during a deployment, and all of them were synchronized to Salesforce in less than a minute (most of the time was spent by Apex classes running in Salesforce). It used to take longer than an hour to synchronize the same amount of objects in the old synchronization system.
For those of us in the cloud computing world, the most exciting thing that came out of Google I/O in 2012 wasn’t skydivers wearing Glass, and it wasn’t a new tablet. The big news was that Google is getting into the cloud infrastructure-as-a-service space, currently dominated by Amazon Web Services (AWS). Specifically, Google has launched a new service called Google Compute Engine to compete with Amazon EC2.
This is exciting. The world needs another robust, performant, well-designed, cloud virtual machine service. With apologies to Rackspace and others, this has been a single-player space for a long time—EC2 is far and away the leader. Google obviously has the expertise and scale to be a serious competitor, if they stick with it.
How does it look? Early reports are positive. Google Compute Engine (GCE) is well-designed, well-executed, and based on infrastructure Google has been using for years. Performance is good, especially disk I/O, boot times, and consistency, which historically haven’t been EC2’s strong suit. But how well suited is GCE for cloud video transcoding? We have some preliminary results, acknowledging that more testing needs to be done. Here are some basic tests of video transcoding and file transfer using Zencoder software on both GCE and EC2.
Raw Transcoding Speed
Performance is our top priority, so Zencoder uses the fastest servers we can find. On EC2, we use Cluster Compute instances, which are fast dual-CPU machines in two sizes: 4XL and 8XL. We compared these with the fastest GCE instance type, which is currently a single-CPU 8-core server.
These tests were done using an H.264 source video at 640×360 and 1280×720 resolutions, and were encoded by Zencoder using the same single-pass output transcoding settings (H.264 Baseline profile, AAC, one-pass Constant Quality transcoding, etc.).
Server
Resolution
Simultaneous Encodes
Time (seconds)
Cost per thousand
EC2 cc1.4xlarge
640×360
6
15.87
$0.96
EC2 cc2.8xlarge
640×360
6
9.93
$1.10
GCE 8-core
640×360
6
21.05
$1.13
GCE 8-core
640×360
1
6.01
$1.94
EC2 cc1.4xlarge
640×360
1
5.96
$2.15
EC2 cc1.4xlarge
1280×720
6
48.58
$2.92
EC2 cc2.8xlarge
640×360
1
4.99
$3.33
EC2 cc2.8xlarge
1280×720
6
30.74
$3.42
GCE 8-core
1280×720
6
68.15
$3.66
EC2 cc1.4xlarge
1280×720
1
12.89
$4.65
GCE 8-core
1280×720
1
16.01
$5.16
EC2 cc2.8xlarge
1280×720
1
10.92
$7.28
Using default Zencoder settings, both types of EC2 instance are faster than GCE. The economics are a bit closer, and there isn’t a clear winner between 4XL EC2 instances and GCE. So GCE is a viable option for transcoding where cost is a higher priority than raw speed, though AWS customers can make use of Reserved Instances and Spot Instances for further cost reductions. We noticed that the 16-core EC2 instances were roughly twice as fast as GCE 8-core instances when under load with 6 simultaneous transcodes.
Given the similar clock speeds, but half the number of cores, this is what you would expect. However, if Google adds similar 16 core machines, they could have comparable transcoding speeds.
Transfer Speeds
When transcoding video in the cloud, network I/O is almost as important as CPU. This is especially true for customers working with high-bitrate content (broadcasters, studios, and creatives). So how do GCE transfer speeds compare to EC2? To test this, we ran four sets of benchmarks:
Amazon S3 to Amazon EC2
Amazon S3 to Google Compute Engine
Google Cloud Storage to Amazon EC2
Google Cloud Storage to Google Compute Engine
We did this by testing the same 1GB video file stored on Google Cloud Storage (GCS) and on Amazon S3. Transfer was performed using 10 HTTP connections (Zencoder does this by default to optimize transfer speeds, and it can dramatically speed up large file transfers over HTTP).
Transfer speed (Mbps)
Server Bandwidth
S3 to GCE
470.96
1 Gbps
S3 to EC2 c1.xlarge
644.29
1 Gbps
S3 to EC2 cc2.8xlarge
1458.32
10 Gbps
GCS to GCE
202.60
1 Gbps
GCS to EC2 c1.xlarge
378.28
1 Gbps
GCS to EC2 cc2.8xlarge
641.34
10 Gbps
This is interesting. We expected Amazon-to-Amazon transfer to be fast, which it was. But we also expected Google-to-Google transfer to be fast, which it wasn’t. In fact, it appears that GCS is slower than S3, and GCE transfer is slower than EC2, such that even if you’re using Google for compute, you may be better off using S3 for storage. Transfer was 2.3x faster from S3 to GCE than from GCS to GCE.
More Tests Needed
Consider these results preliminary. Further testing needs to be done to take into account more variables.
Instance-to-instance differences. This is especially true for file transfer, which can vary widely based on network conditions and instance variability.
Additional applications. These benchmarks only cover transcoding, which is a CPU-bound benchmark. Other applications are limited by disk, memory, etc., and these tests don’t speak to anything other than transcoding.
Scalability. Scalability is extremely important for anyone using the cloud for video transcoding. More tests are needed to see how GCE compares with EC2 when it comes to enormous scale—tens of thousands of servers (or more). At what point do users run into capacity issues? Performance problems? Design limitations? Instability?
Cloud Infrastructure Future
Even though EC2 wins in these early tests, we’re excited about Google Compute Engine. To be a serious competitor for high-performance transcoding, Google needs to add larger instances with faster CPUs. But adding new instance types is easy. Nothing prevents Google from doing this. What is hard is building a robust, performant, feature-complete, scalable cloud platform, and Google seems to have succeeded. If Google is committed to this product and developers for the long run, the cloud virtualization world may have just gotten a second legitimate player.
Closed captioning is a good thing for accessibility and usability, and is yet another milestone as internet video marches towards maturity. Unfortunately, closed captioning is not a single technology or “feature” of video that can be “turned on.” There are a number of formats, standards, and approaches.
Closed captioning is kind of a mess, just like the rest of digital video, and is especially challenging for multiscreen publishers. So if you want to publish video today for web, mobile, and Connected TV delivery, what do you have to know about closed captioning?
This post will outline the basics: how closed captions work, formats you may need to know about, and how to enable closed captions for every screen.
How Closed Captions Work
The first thing to understand is how closed captions are delivered, stored, and read. There are two main approaches today.
Embedded within a video. CEA-608, CEA-708, DVB-T, DVB-S, WST. These caption formats are written directly in a video file, either as a data track or embedded into a video stream itself. Broadcast television uses this approach, as does iOS.
Stored as a separate file. DFXP, SAMI, SMPTE-TT, TTML, EBU-TT (XML), WebVTT, SRT (text), SCC, EBU-STL (binary). These formats pass caption information to a player alongside of a video, rather than being embedded in the video itself. This approach is usually used by browser-based video playback.
Differences Between Subtitles and Closed Captions
What about subtitles? Are they the same thing as closed captions? It turns out that there are three main differences.
Goals. Closed captions are an accessibility feature, making video available to the hard of hearing, and may include cues about who is speaking or about what sounds are happening: e.g. “There is a knock at the door”. Subtitles are an internationalization feature, making video available to people who don’t understand the spoken language. In other words, you would use captions to watch a video on mute, and you would use subtitles to watch a video in a language that you don’t understand. Note: This distinction holds in North America, but much of the world does not distinguish between closed captions and subtitles.
Storage. Historically, captions have been embedded within video, and subtitles have been stored externally (see CEA-608 below). This makes sense conceptually, because captions should always be provided along with a video; 100% accessibility for hard-of-hearing is mandated by legislation. Whereas subtitles are only sometimes needed; a German-language video broadcast in Germany doesn’t need to include German subtitles, but that same video broadcast in France would.
Playback. Since captions are passed along with the video and interpreted/displayed by a TV or other consumer device, viewers can turn them on and off themselves at any time using the TV itself, but rarely have options for selecting a language. In these situations when subtitles are added for translation purposes, they are generally hard subtitles (see below) and thus cannot be disabled. However, when viewing DVD/Blue-Ray/VOD video, the playback device controls whether subtitles are displayed, and in which language.
Formats and Standards
There are dozens of formats and standards for closed captioning and subtitles. Here is a rundown of the most important ones for internet video.
CEA-608. Also called Line 21, CEA-608 captions are the NTSC standard, used by analog television in the United States and Canada. Line 21 captions are encoded directly into a hidden area of the video stream by broadcast playout devices. If you’ve ever seen white bars and dots at the top of a program, that’s Line 21 captioning.
SCC. This file contains captions in Scenarist Closed Caption format. It contains SMTPE timecodes with the corresponding encoded caption data as a representation of CEA-608 data.
CEA-708. This is the standard for closed captioning for ATSC digital television (DTV) streams in the United States and Canada. There is currently no standard file format for storing CEA-708 captions apart from a video stream.
TTML. Timed Text Markup Language describes the synchronization of text and other media such as audio or video. See the W3C TTML Recommendation for more.
DFXP. This is a profile of TTML defined by W3C. DFXP files contain TTML that defines when and how to display caption data. DFXP stands for Distribution Format Exchange Profile. DFXP and TTML are often used synonymously.
SMPTE-TT. The Society of Motion Picture and Television Engineers – Timed Text is an extension of the DFXP profile that adds support for three extensions found in other captioning formats and informational items but not found in DFXP: #data, #image, and #information. SMPTE-TT is also the FCC Safe Harbor format. If a video content producer provides captions in this format to a distributor, they have satisfied their obligation to provide captions in an accessible format. However, video content producers and distributors are free to agree upon a different format.
SAMI. Synchronized Accessible Media Interchange is based on HTML and was developed by Microsoft for products such as Microsoft Encarta Encyclopedia and Windows Media Player. SAMI is supported by a number of desktop video players.
EBU-STL. This is a binary format used by the EBU standard, stored in separate .STL files.
EBU-TT. This is a newer format supported by the EBU, based on TTML. EBU-TT is a strict subset of TTML, which means that EBU-TT documents are valid TTML documents, but some TTML documents are not valid EBU-TT documents because they include features not supported by EBU-TT.
SRT. This is a format created by SubRip, a Windows-based open source tool for extracting captions or subtitles from a video. SRT is widely supported by desktop video players.
WebVTT. This is a text format that is similar to SRT. The Web Hypertext Application Technology Working Group (WHATWG) has proposed WebVTT as the standard for HTML5 video closed captioning.
Hard subtitles. Hardsubs are, by definition, not closed captioning. Hard subtitles are overlaid text that is encoded into the video itself, so that they cannot be turned on or off, unlike closed captions or soft subtitles. Whenever possible, soft subtitles or closed captions are generally be preferred, but hard subtitles can be useful when targeting a device or player that does not support closed captioning.
Captioning for Every Device
What formats get used by what devices and players?
HTML5. Captions are not yet widely supported by browsers, but that will change over time. There are two competing standards: TTML, proposed by W3C, and WebVTT, proposed by WHATWG. At the moment, Chrome has limited support for WebVTT; Safari, Firefox, and Opera are all working on WebVTT support; and Internet Explorer 10 supports both WebVTT and TTML. Until browsers support a format natively, an HTML5 player framework like Video.js can support captions through Javascript, by parsing an external file (Video.js currently supports WebVTT captions).
iOS. Apple takes a different approach, and uses CEA-608 captions using a modified version of CEA-708/ATSC legacy encoding. This means that, unlike HTML5, captions must be added at the time of transcoding. Brightcove Zencoder can add captions to HTTP Live Streaming videos for iOS.
Android. Video player support is still fragmented and problematic. Caption support will obviously depend on the OS version and the player used.
Other mobile devices. Some have no support for closed captions at all, and hard subtitles may be the only option.
Roku. Supports captions through external SRT files.
Other Connected TV platforms. Some do not support closed captioning yet. But they will soon enough. Every TV, console, cable box, and Blu-Ray player on the market today wants to stream internet content, and over the next year and a half, closed captioning will become a requirement. So Sony, Samsung, Vizio, Google TV, et al will eventually make caption support a part of their application development frameworks. Unfortunately, it isn’t yet clear what formats will be used. Most likely, different platforms will continue to support a variety of incompatible formats for many years to come.
Closed Captioning Requirements
The landscape for closed captioning will change and mature over time, but as of 2012, here are the most common requirements for supporting closed captioning on common devices.
A web player with player-side controls for enabling and disabling closed captioning.
An external file with caption data, probably using a format like WebVTT, TTML, or SRT. More than one file may be required (e.g. SRT for Roku and WebVTT for HTML5).
A transcoder that supports embedded closed captions for HTTP Live Streaming for iPad/iPhone delivery, like Zencoder. Zencoder can accept caption information in a variety of formats, including TTML, so publishers could use a single TTML file for both web playback and as input to Zencoder for iOS video.
Beyond there, things get difficult. Other input formats may be required for other devices, and hard subtitles are probably necessary for 100% compatibility across legacy devices.
Brightcove Zencoder and Captions
Brightcove Zencoder supports closed captioning for two formats: CEA-608-style captions for iOS devices using HLS, and MP4 files with CEA-608 caption tracks. On the input side, we support SCC, SAMI, DFXP/TTML/SMPTE-TT, and CEA-608 caption tracks in MP4 files.
To date, we’ve chosen to focus on embedded captions because these formats are added to video files at the point of transcoding. So if we didn’t support captioning for iPad or iPhone, our customers publishing to these devices wouldn’t be able to use closed captions. In the future, we’ll expand the range of caption formats we accept, and we may provide services like format conversion for external caption files (e.g., TTML to WebVTT).
In the meantime, with a single caption file and the right HTML5 player, Brightcove customers have everything they need to create captioned videos for web, mobile, and Connected TV devices.
During my 13 years as a web developer and designer, I’ve effortlessly adapted to new technologies—starting with Java, then PHP, and later Ruby. For a long time, I was immersed in the “Flash steamer,” exploring major UI libraries like Prototype and jQuery while staying up-to-date with rapidly evolving web standards.
However, like many web developers, I missed the leap into mobile applications. I lacked experience with low-level languages like C++ or Objective-C and didn’t have the time to learn them. The idea of creating “small” apps in Java—a language I found bulky and extensive—was equally unappealing.
I explored several cross-platform development tools, but they consistently fell short of expectations:
App “factories” that wrap RSS feeds in pre-built templates created generic, uninspired apps.
Frameworks converting JavaScript or ActionScript into native code required complex toolchains for app creation and compilation.
Frameworks that wrapped web pages in native shells offered little infrastructure for deploying data-driven apps in production environments.
When I discovered App Cloud, a framework for creating native mobile apps using HTML, CSS, and JavaScript, I was skeptical. Would it be any different from the others? Could it deliver on its promises? After developing my first app, I can confidently say the answer is “Yes!” Here’s why.
APP CLOUD SPEAKS THE LANGUAGE OF DEVELOPERS
App Cloud relies on the core skills of web developers: HTML to structure content, CSS to shape, and JavaScript to edit it. There’s no need to learn new languages to create content-driven, rich apps. Web technologies have always excelled in simplicity. Compare the complexity of creating a table view in iOS with the ease of creating a basic HTML list—it’s no contest!
The App Cloud SDK also supports almost any JavaScript library, letting me apply tricks I’ve mastered over years of web development.
IN THE FAST LANE WITH APP CLOUD
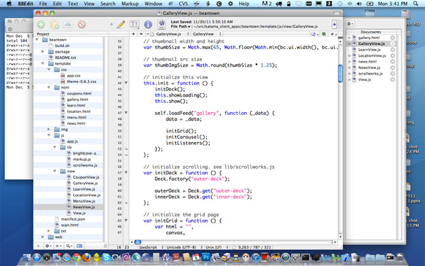
I frequently switch between BBEdit and vim when coding, as they remain my most comfortable tools. App Cloud allows me to keep using these familiar editors. Since it relies on standard web technologies, I can also debug and test my code with Chrome Developer Tools. Unlike cumbersome systems tied to XCode or Eclipse, App Cloud provides flexibility and freedom.
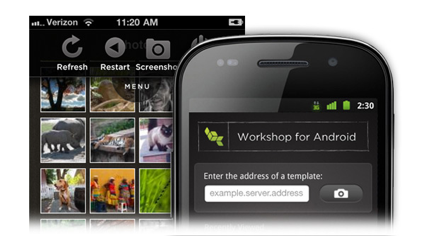
RAPID ITERATION WITH THE WORKSHOP APP
The App Cloud workshop app for iOS and Android enables real-time testing during development. After making code changes, I simply click “Refresh” to immediately view updates. For web developers accustomed to iterative processes—code, refresh, repeat—this feature is invaluable.
While much testing can be done on desktop browsers, nothing beats seeing how an app performs on actual devices. The workshop app makes this easy and seamless.
LEVERAGING DEVICE-SPECIFIC FEATURES
App Cloud offers a straightforward JavaScript API for accessing device-specific functionalities, such as the camera or photo library. For instance, scanning a QR code is as simple as:
bc.device.getQRCode( function (data) { /* handle success */ }, function (error) { bc.device.alert("Oops! " + error.errorMessage); } );
SIMPLIFIED APP COMPILATION
Compiling apps with other tools, like Android developer kits, often feels like assembling IKEA furniture: tedious and frustrating. With App Cloud Studio, apps are compiled in the cloud with just a few clicks. In minutes, the app is ready for download and deployment to various app stores—no special tools required.
CONTENT OPTIMIZATION: LESS IS MORE
In content-driven apps, content itself is often the bottleneck. App Cloud optimizes performance by:
Removing unnecessary data, compressing feeds, and caching content. For example, my blog feed shrank from 39KB to 4KB—a 90% reduction.
Transcoding images to reduce file size. One image went from 125KB at 425 pixels wide to 8KB at 200 pixels wide—a 94% reduction.
These optimizations significantly improve load times, which are critical for user engagement.
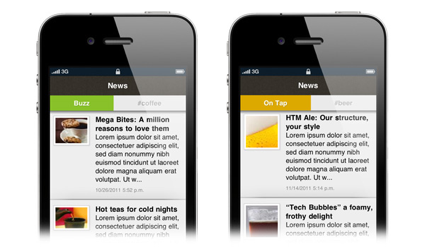
FLEXIBILITY BEYOND DEPLOYMENT
Unlike other tools, App Cloud Studio allows me to modify data, design, and settings post-deployment—no need to recompile or redistribute the app. This flexibility enables me to create multiple apps from a single template by swapping data feeds and adjusting settings.
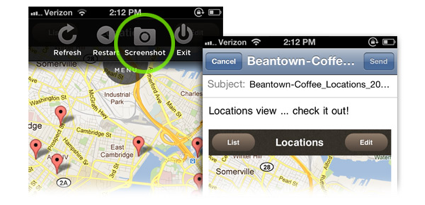
COLLABORATION MADE EASY
App Cloud makes it simple to share apps with colleagues. Screenshots can be shared directly from the workshop app, or templates can be distributed via URLs or QR codes, enabling efficient collaboration and testing.
COMPREHENSIVE CLOUD MANAGEMENT
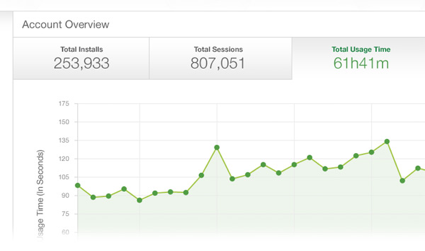
App Cloud offers everything I need to manage and monetize apps, from native ad delivery to real-time analytics. I can track installations, usage time, and other key metrics.
Additionally, App Cloud provides free performance enhancements and feature updates. Future improvements, such as push notifications and in-app purchases, will make the platform even more powerful.
App Cloud combines the simplicity of web development with the functionality of native apps, making it an indispensable tool for developers looking to create efficient, scalable, and engaging mobile apps.
Any serious video publisher either already supports iPad and iPhone or needs to think hard about adding support. For some major publishers, iPad delivery represents a third of total video views or more.
Encoding for iOS is a little tricky, though. These devices have gone through several generations of technical capabilities, and the ideal video settings for the iPhone 4 are not ideal for the iPhone 3GS or for the iPad.
Fortunately, with just a few encoding profiles, you can stream high quality video to every iOS device, from the first iPhone to the iPad 2, and even prepare for future generations of mobile hardware.
General Settings
Like most video today, use h.264 video and AAC audio when targeting iOS.
On the audio side, consider using HE-AAC at <64kbps, for App Store compliance. HE-AAC sounds reasonably good at these bitrates, even for complex audio.
On the video side, use multiple profiles to target each device. The iPhone 3GS and earlier only supports the h.264 Baseline profile, level 3.0 (and some support a more constrained version than that), whereas newer devices support the Main and High profiles.
For the best user experience, HTTP Live Streaming (HLS) is a must. Apple requires it of any video app in the App Store that plays content longer than 10 minutes, and it is the only true streaming format supported by iOS. HLS is also being adopted by Android (version 3+), Roku, and a range of other destinations.
These are just recommendations. Different resolutions and bitrates are perfectly valid, and may actually be preferable in some circumstances. For example, extremely complex content may warrant higher bitrates.
720p is the largest video playable on iPad 1 and iPhone 4, and iPad 2/iPhone 4S play anything up to 1080p. But since the native display is only 1024 pixels wide, going all the way to 720p or 1080p isn’t critical. Unless, of course, you want to reuse a video somewhere else—720p is a great resolution for fullscreen web playback, and 1080p is entirely appropriate for Connected TVs. Future iPads are rumored to have 4x the resolution of the current iPad, so consider adding 720p for future-proofing.
The h.264 profile is important. The iPad 1 and iPhone 4 both support the Main profile. The iPad 2/iPhone 4S support the High profile, which is marginally better than Main, but given the number of iPad 1 devices in the world, it is probably better to stick to Main profile. For truly optimal device targeting, encode to both Main and High.
These six resolutions and bitrates provide reasonably good coverage of varying bandwidth. You could certainly do more, so add or subtract resolutions and profiles as desired.
Legacy iPhone/iPod Touch users will have three streams available to them, including a reasonably high quality 480×320 video (the screen resolution of these devices). Users of the iPad and iPhone 4 will be able to make use of all six streams.
The resolution scaler on the iPad is pretty good, so videos that are rescaled will generally look good.
As much as possible, these settings allow for resolution dimensions divisible by 16. This makes for more efficient compression. The efficiency gains are small, especially at high resolutions, but at lower resolutions they start to make a difference.
Be sure to keep the audio identical across each video. If the audio specifications change from one version to another, the user may hear pops and clicks during playback when switching streams.
Other Settings
Set the speed based on desired turnaround time. For these recommendations, we’re going to use Speed 2, which improves compression a bit over the baseline but is still reasonably fast.
Ensure that each segment is roughly the same size by using a peak bitrate\_cap of 150% of the target bitrate, but within a long buffer\_size (e.g., five seconds, or 5x the bitrate\_cap).
Brightcove automatically chooses proper keyframe placement when you set the type to “segmented.” If you’re encoding to MP4 for separate segmenting to HLS, set forced\_keyframe\_rate to “0.2” or “0.1” (for five or 10 second keyframe intervals, respectively).
If you can accept slightly unpredictable bitrates, add quality to the mix, and change video\_bitrate to max\_video\_bitrate to optimize for file size. The encoder will use the max bitrate when needed, and will use a lower bitrate when it can achieve the desired quality with fewer bits.
Set the max\_frame\_rate to 30 and the max\_audio\_sample\_rate to 48000.
The first generation if iOS devices only allow one h.264 reference\_frame, so enable this on the Baseline streams for max compatibility.
In this article, we will introduce a Google Analytics integration program that allows you to measure videos using Google Analytics. The Google Analytics integration program can be used if you have a Video Cloud contract and already have Google Analytics.
More and more companies are discovering the diverse potential of online videos: their immense popularity with users, their ability to evoke emotions, excellent marketing opportunities, significant boosts to product sales, and even improved search engine rankings. However, many overlook the unique challenges and hurdles associated with leveraging videos effectively.
Even with a coherent video concept and professionally produced clips, one critical question remains: How should the videos be integrated into the company’s website? There are three primary options.
1. DIY SOLUTIONS
The first option is an individual solution. A (hopefully) skilled employee encodes the videos, programs a Flash player or configures a freely available player, uploads the videos to an HTTP server, and integrates them into the website.
While this approach may work for a small number of videos with limited views, it quickly becomes impractical when handling more videos or higher traffic. This DIY solution can become disorganized, error-prone, maintenance-intensive, and time-consuming.
2. SOCIAL VIDEO SITES
The second option involves using social video sites like YouTube. By uploading videos to these platforms, companies receive embed codes to integrate the videos into their websites. These sites offer relatively robust statistics on video usage, and the videos are discoverable not only on the company website but also via YouTube’s search.
However, this solution comes with significant drawbacks. By uploading videos to YouTube, companies partially relinquish rights, allowing YouTube to market the videos, which could result in competitor advertisements running before the company’s content. Additionally, YouTube retains control over the video’s appearance and technical specifications, leaving companies dependent on the platform’s decisions. In this scenario, companies hand over control to YouTube and must accept whatever changes or limitations come their way.
3. ONLINE VIDEO PLATFORMS (OVPS)
This is where Brightcove comes in as the third and most professional option. An OVP combines the customization of a DIY solution with the technical capabilities of a social video site while offering legal security and complete control.
Of course, an OVP requires an investment—but it’s no different from other professional tools and systems companies routinely use. For a relatively small cost, customers gain access to a comprehensive, well-maintained, and continuously improved system.
KEY ADVANTAGES OF OVPS
Reliable delivery: Videos are delivered via Content Delivery Networks (CDNs), ensuring performance without straining the company’s servers.
Detailed analytics: OVPs provide detailed statistics on video views, enabling companies to measure effectiveness and gain insights for future productions.
Complete control: Videos remain under the company’s full control, with the ability to integrate monetization through connections to ad servers or advertising networks.
Optimized workflows: OVPs minimize technical tasks and risks, streamlining video production and distribution processes.
Online video platforms are designed specifically for the professional use of videos. They allow companies to optimize workflows, reduce technical challenges, and use videos on the internet effectively, securely, and cost-efficiently. By investing in an OVP, companies can unlock the full potential of online videos while maintaining complete control and ensuring long-term success.