
Our start-to-finish guide to video interviews
Brightcove News

Have you ever finished an interview, only to wonder if you even got the soundbite you really needed? It turns out, there’s a pretty fool-proof way to avoid this situation, and it doesn’t involve rolling up to your interview set and crossing your fingers that the subject says exactly what you need them to say. After all, if you want to be the next Terry Gross or Barbara Walters, you’ve got to put in some work.
Here’s our step-by-step process for ensuring that you walk out of your next interview with soundbite gold.
Video interview tips from start to finish
1. Create a story outline
The first step is understanding the type of story that your interview will be part of. Every story has its own narrative and sequence of events. But generally speaking, you have an overall structure that fits into a story archetype. For example, in customer storytelling, the story is often about your customer overcoming challenges with your product or brand as a partner—so you want to explain the challenges and the steps your customer took to overcome them. To make it compelling, you’re looking for conflict: what were the roadblocks in the beginning? What issues came up throughout? That’s where you get to talk about how your brand is a true strategic partner to its customers.
When your structure is in place, you research every aspect of your story to add depth. Just like a job interview, you absolutely don’t want to show up unprepared—you should already have an idea of what the answers might be, be familiar with any technical concepts, and know the story backwards and forwards so you know how to communicate with your subjects and ask the right follow-up questions. Your subject will open up a lot more if they recognize that you know what you’re talking about.
2. Conduct pre-interviews
The story you mapped out in step one likely has a few characters. You next have to figure out who those characters are, and who lived through each part of the story. Think of this step as casting your video. When you have a list in mind, you want to talk to those people over the phone or video chat. This is a pre-interview—think of it as an audition and a fact-finding mission rolled into one.
You’ll find out who speaks clearly and who gives one-word answers, learn background details on your story, discover areas where you need to do more research before actual interviews begin, and build rapport with your subjects. Gauge what is going to get them to talk: are they touchy-feely and want to approach things from emotions? Are they tech-focused and want to approach things from the implementation or technical side?
3. Create a list of questions
Now that you’ve done all the necessary research and filled out your story outline with details from your pre-interviews, you use that outline to create your interview questions. With each milestone in your story, you should know who you’ll be talking to and what you need them to describe. Here's an example of how I map questions to my story outline using a tool called iThoughts:
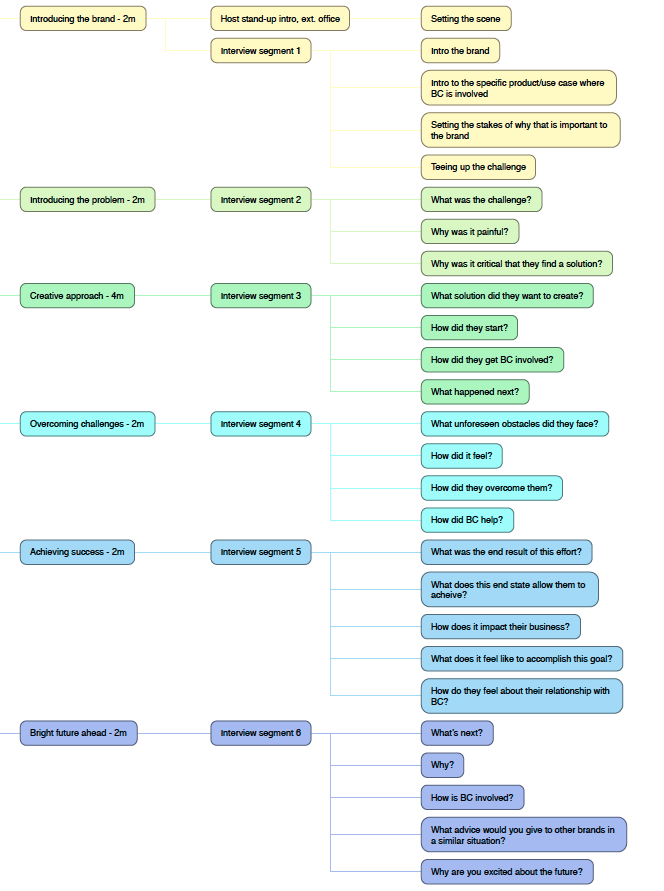
The list of questions doesn’t have to be super prescriptive, and you may not stick to it 100 percent. But it should give you an idea of the must-have information that you’ll need.
4. Conduct your interview
Alright, it’s time for your interview—take a deep breath. You’ll want to be relaxed so that your subject feels at ease. When they arrive, engage them in small talk and be friendly—if you cut straight to business, they may feel rushed and get defensive. Because they’ll be on camera, it’s important that they feel comfortable.
When they get on set, help them get situated, then take your place. Explain what they should expect during the interview, tell them where to look (at you? At the camera?), and remind them it’s okay to restate an answer or ask for clarification. Ask them a couple easy questions, like what they ate for breakfast. This not only helps them get settled, it also gives your crew time to test audio and set focus.
When you’re ready to get started, keep the tone conversational and give your subject plenty of room to answer. If you take nothing else away from this post, make this your golden rule: wait a few seconds after your subject finishes speaking before you respond. It may feel awkward, but it’s essential—it ensures that you don’t interrupt or speak over them, making the audio unusable, and it also gives them room to add more information. That’s often where I’ve gotten some of the most compelling stories. If you feel tempted to acknowledge or interact while your subject is speaking, stick to silent cues like nodding and smiling.

If you’re not getting an answer that you need, feel free to move on and circle back to it later (just make a note so you don’t forget). Rephrase questions, or fall back on open-ended follow-ups like “Why?” or “How did that make you feel?”
I like to close interviews with forward-looking questions like “What are you excited to do next?” That puts people in a good frame of mind, even if it’s not useful to your final product. You want your subject to leave the interview feeling happy with the result.
5. Send a thank-you email, reinforcing key information
Follow up in a timely manner. Thank your subject for their time and resources, and reinforce the key details they’ll want to know. This can include the next steps in your production process, how the footage will be used, and the agreed-upon approval process.
That does it! Follow these steps and you’ll become your company’s go-to interviewer—not to mention your editor’s hero when it comes time to pull soundbites. Want more tips on video strategy? Check out our round-up of video resources.